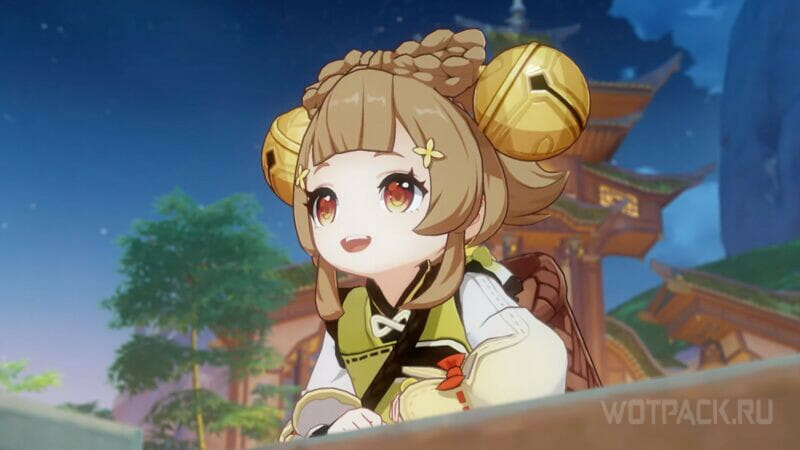
In Genshin impact, Yaoyao is The youngest disciple of the Adepti and a handy support hero who can heal allies, hit enemies, and inflict elemental status that can later be used to trigger reactions. With constellations, she gains buffing abilities and can boost allies.
Her damage is based on ATK and her healing is based on HP, so she needs to be built into what is needed in a specific situation or into a hybrid build. Despite her element, she can play in almost any team as a support, but she shows herself best in Quicken, Burning, Burgeon, Bloom teams.
| Rating | A-position in tier lists |
| Rarity | ⭐️⭐️⭐️⭐️ |
| Appeared in-game | January 18, 2023 (patch 3.4) |
| How to get | Character Event and Standard Banners |
| Element | Dendro🍃 |
| Weapon | Polearm (spear) |
| Gender | Female |
| Affiliation |
|
| Constellation | Osmanthus |
| Home region | Liyue |
| Birthday | March 6 |
| Zodiac sign | Fish |
| Age | 8-12 years old |
| Height | 140-145 cm |
| Special dish | Qingce Household Dish |
| Voice Actors |
|
How to Get the Character
Yao Yao can be obtained with an increased drop rate from the event banner that runs in the first half of update 6.1. 22 October to 11 November 2025, either from the standard or weapon prayer. All constellations are unlocked when you get copies of the character.
To track new characters' releases and reruns, follow our banner schedule.
Strengths and Weaknesses

The Disciple of the Adepti is a support hero and has the following perks that help you better understand whether to build Yaoyao or not:
| Strengths | Weaknesses |
| A versatile support healer who will fit into any Dendro squad to keep the active ally's HP high. She is especially effective in Blooming, Blooming, and Hyperbloom teams, as in this case the heroes also take damage from the explosion of the cores. | The Adeptal Legacy effect from the elemental burst is interrupted if she leaves the battlefield. So she will have to either take time from the main DD or use the skill less often. Not critical for the support DD role. |
| The healing bonus is based solely on HP, which increases with ascension. This makes it much easier to pick up gear if the she is used solely as a healer. | Ult costs 80 energy, for which you need to gain enough energy recharge in stats to activate the skill as needed. |
| Can take the support DD position thanks to the Throwing and Jumping Yuegui mechanics of the elemental skill and ultimate. They not only additionally heal allies, but also deal periodic damage to enemies. For example, Throwing Yuegui works from off-field to apply status, and Jumping Yuegui is more suitable for triggering a reaction. | It is difficult to choose stats for dealing powerful damage and healing, since healing depends on HP, and skill damage depends on attack power. |
| During her ult, gains a 15% movement speed bonus and increases her resistance to Dendro. | There is no instant healing for the entire squad, as it is tied to the area of effect of the explosion of the White Jade Radish. |
| Becomes a buffer with 1st constellation. C1 gives a 15% Dendro bonus and restores 15 stamina to squad members in the area of effect of the White Jade Radish explosion. | Narrow focus, can only reveal the potential to the maximum in teams with Dendro reactions (if used as a healer, can be added to any squad). |
| When the student is in a team, companions are no longer intimidating crystal butterflies, axolotls, frogs, crabs and so on. The rest of the animals are listed in the archive (Living Beings / Wildlife / Other). |
The Best Yao Yao Builds in Genshin Impact

The Disciple of the Adepti is a Dendro support with an emphasis on healing the active partner during combat, which is what the Yaoyao build should focus on. In addition, the mechanics of her skills involve dealing damage in order to trigger reactions. That is, she can also act as a Dendro reactor or applicator.
Recommended Stats
When creating a build, you can focus on both healing and damage (with the 6th constellation). Alternatively, there is an option to make a mixed build, but in this case it becomes difficult to balance all the necessary stats.
Support Healer
In the support position, she needs to keep the main damage dealer's health high, and also buff them as much as possible before leaving the battlefield. Since her healing percentage scales with HP, it is important to focus on this stat. Other stats (depending on the situation): energy recharge, EM, bonus healing.
| Artifact | Main characteristic | Additional stats |
|---|---|---|
 Flower of Life Flower of Life | HP (fixed) | HP% HP (flat) Energy Recharge % Elemental Mastery |
 Plume of Death Plume of Death | Attack Power (fixed) | HP% HP (flat) Energy Recharge % Elemental Mastery |
 Sands of Eon Sands of Eon | HP% | HP (flat) Energy Recharge % Elemental Mastery |
 Goblet of Eonothem Goblet of Eonothem | HP% | HP (flat) Energy Recharge % Elemental Mastery |
 Circlet of Logos Circlet of Logos | HP% Healing Bonus % | HP % / HP (flat) Energy Recharge % Elemental Mastery |
Optimal stat values:
- HP (health): about 35.000-40.000 HP.
- Energy recharge: 200% and more
- Elemental mastery: 250. Strong emphasis on this stat in the position of a healer is not necessary, but in Dendro teams it is not an extra anyway.
Sub-dd reactor
In this build, the student focuses on triggering Dendro reactions. Thus, her main stat here is EM. She also requires a lot of energy recharge. For a support DD, the priority of ER increases, since her ult summons Jumping Yuegui (including during sprint, dashes and jumps) and receives 15% to movement speed. Other stats (depending on the situation): Crit Rate, Crit DMG, ATK, HP.
| Artifact | Main characteristic | Additional stats |
|---|---|---|
| Flower of Life | HP (fixed) | Elemental Mastery Energy Recharge % ATK % Crit Rate / Crit. damage |
| Plume of Death | Attack Power (fixed) | Elemental Mastery Energy Recharge % HP% Crit Rate / Crit. damage |
| Sands of Eon | Elemental Mastery | Energy Recharge % ATK % HP% Crit Rate / Crit. damage |
| Goblet of Eonothem | Elemental Mastery Dendro Damage Bonus % | Energy Recharge % ATK % HP% Crit Rate / Crit. damage |
| Circlet of Logos | Elemental Mastery Crit Rate / Crit. damage | Crit chance / Crit. Damage / Elemental Mastery Energy Recharge % Attack Power% |
Optimal stat values:
- Elemental mastery: 450-500.
- Energy recharge: 220% and more.
- Attack power: 1500 and more. This stat affects the damage of skills, which is important for inflicting your own damage.
- Crit Rate and Crit Damage: ratio 1:2 (50 rate and 100 dmg). Crits play a role only in the Quicken reaction (Electro + Dendro), but for the flexibility of the build, it is desirable to get at least 1:2.
If you want the heroine to not only trigger reactions, but also heal, you should get her at least 25.000 HP.
Weapon Tier List
The weapon should be selected based on the role she occupies:
- For support healer needs HP, team buffs, energy recovery/elemental mastery.
- For reactions trigger: Elemental Mastery, Energy Recovery, Elemental Damage, ATK (for skill damage), Crit (for Spread reaction).
Equipment that is effective for other characters has been dismantled in weapon tier list.
Support Healer
To support the squad and the main damage dealer, it is recommended to use the following spears:
| number | Name | Rarity | Base stats | Passive Effects |
|---|---|---|---|---|
| 1 | 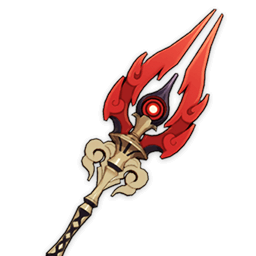 Staff of Homa Staff of Homa | ⭐️⭐️⭐️⭐️⭐️ | Base stat: 46 - 608 Critical Damage 14,4%-66,2% | Increases HP by 20-40%. Also grants an attack bonus equal to 0,8-1,6% of max HP of the character equipped with this weapon. When a hero's health drops below 50%, their attack power is additionally increased by 1-1,8% of their max HP. The girl's healing depends on her HP value, which the weapon gives in percentage and without any conditions. At the same time, it is quite universal and can be used in any build, including for dealing damage due to crits and attacks. |
| 2 | 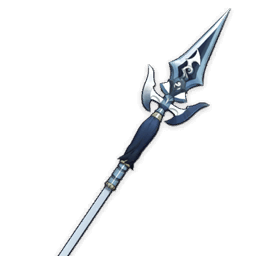 Black Tassel Black Tassel | ⭐️⭐️⭐️ | Base stat: 38 - 354 HP 10,2%-46,9% | Increases damage to slimes by 40-80%. A spear with a basic HP stat that can be easily obtained and upgraded since it is 3*. If you need to maximize your healing percentage, this is the most accessible weapon. |
| 3 | 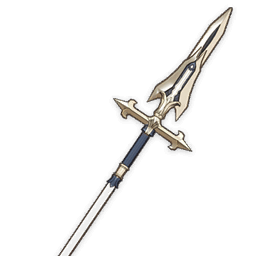 Favonius Lance Favonius Lance | ⭐️⭐️⭐️⭐️ | Base stat: 44 - 565 Energy recharge 6,7-30,8% | Critical attacks have a 60-100% chance to create elemental particles that restore 6 energy. It can occur once every 12-6 seconds. Does not increase HP, but gives the ability to restore energy to allies. In this case, it even makes sense to use an artifact circlet with crit chance so that the bonus works more often. |
| 4 |  Dialogues of the Desert Sages Dialogues of the Desert Sages | ⭐️⭐️⭐️⭐️ | Base stat: 42–510 HP: 9-41.3% | An equipped character, when healing squad characters, restores 8/10/12/14/16 energy. The effect can occur once every 10 seconds. and works even when the hero is not on the battlefield. Gives a lot of health and makes it easier to restore energy without forcing you to drag the heroine out onto the field. |
| 5 | 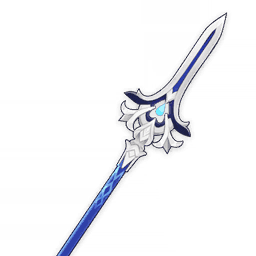 Rightful Reward Rightful Reward | ⭐️⭐️⭐️⭐️ | Base stat: 44 - 565 HP 6,0-27,6% | When receiving healing, the character recovers 8 - 16 energy. The effect can occur once every 10 seconds. and works even when the character is not on the battlefield. Doesn't increase maximum health as much as Black Tassel, but has a more useful effect and a higher base. The character can easily use the passive to recharge the ultimate. Since the weapon is craftable, it is one of the best readily available choices if there are no alternatives above. |
| 6 | 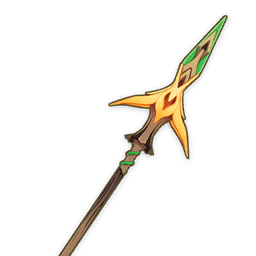 Moonpiercer Moonpiercer | ⭐️⭐️⭐️⭐️ | Base stat: 44–565 Elemental Mastery 24–110 | Elemental Reactions with Dendro create a Leaf of Revival that lasts 10 seconds next to the character. The Leaf increases the attack power of the hero who picks it up by 16-32% for 12 seconds. Any character from the squad can pick up the Leaf of Revival. The effect does not trigger more than once every 1 seconds. The best and also free option. Increases elemental mastery, and when reactions are activated, creates sheets that can be picked up by other squad members. Does not affect healing in any way, but will be useful to the team. |
Sub-dd reactor
The following weapons are suitable for creating powerful reactions:
| number | Name | Rarity | Base stats | Passive Effects |
|---|---|---|---|---|
| 1 |  Staff of the Scarlet Sands Staff of the Scarlet Sands | ⭐️⭐️⭐️⭐️⭐️ | Base stat: 44 - 542 Critical Hit Chance 9.6%-44.1% | Increases the attack bonus of the character equipped with this weapon by 52-104% from their elemental mastery. Hitting an enemy with an elemental skill for 10 sec. bestows the Dream of the Scarlet Sands: The attack bonus of a character equipped with this weapon is increased by 28-56% of their Elemental Mastery. The effect stacks up to 3 times. Doesn't directly grant Elemental Mastery, but has a high Crit Chance and also increases ATK based on EM, which is useful in a squad with Electro to trigger the Spread reaction. |
| 2 | Staff of Homa | ⭐️⭐️⭐️⭐️⭐️ | Base stat: 46 - 608 Critical Damage 14,4%-66,2% | Increases HP by 20-40%. Also grants an ATK bonus equal to 0,8-1,6% of max HP of the character equipped with this weapon. When a hero's health drops below 50%, their attack power is additionally increased by 1-1,8% of their max HP. A versatile spear with a health boost for healing, as well as a crit/attack boost for spell damage and the Spread reaction. |
| 3 |  Calamity Queller Calamity Queller | ⭐️⭐️⭐️⭐️⭐️ | Base stat: 49 - 741 ATK 3,6%-16,5% | Gives 12-24 % bonus damage to all elements. Triggering an elemental skill inflicts Consummation for 20 seconds, increasing attack power by 3,2-6,4 % per second. Can stack up to 6 times. When a party character equipped with this weapon is not on the battlefield, the attack bonus from Consummation is doubled. Provides a bonus to elemental damage and ATK, with the latter effect being amplified if the wearer is not on the battlefield. A great option for a support DD in a squad with Electro. |
| 4 |  Engulfing Lightning Engulfing Lightning | ⭐️⭐️⭐️⭐️⭐️ | Base stat: 46 - 608 Restore energy 12%-55,1% | Attack power is increased by 28-56% of energy recovery rate over 100%. Max Attack Power Bonus - 80-120%. When activating an Elemental Burst, Energy Recovery is increased by 30-50% for 12 seconds. The girl's elemental burst is quite expensive (80 energy), so for the support DD position it is also a completely acceptable option, including for dealing damage by increasing attack power. |
| 5 | 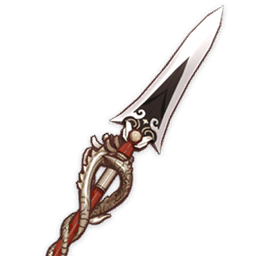 Dragon's Bane ( Dragon's Bane ( | ⭐️⭐️⭐️⭐️ | Base stat: 41 - 454 Elemental Mastery 48 - 221 | Increases by 20-36% damage against enemies afflicted by Hydro or Pyro. The spear with the highest Elemental Mastery bonus, so it's already great for reactions. However, it is best revealed in a squad through Blooming or Burning. |
| 6 | 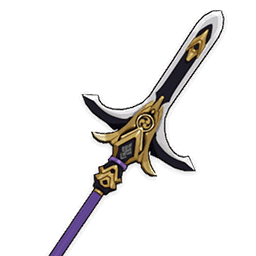 Kitain Cross Spear Kitain Cross Spear | ⭐️⭐️⭐️⭐️ | Base stat: 44–565 Elemental Mastery 24–110 | Elemental skill damage is increased by 6-12%. Successfully attacking an enemy with an E will take away 3 energy, but restore 3-5 energy every 2 seconds for 6 seconds. The effect does not trigger more than once every 10 seconds, even when the character is not on the field. Free crafted spear from Inazuma. Will increase not only EM, but also E damage, which can also trigger reactions from off-field. |
| 7 | Moonpiercer | ⭐️⭐️⭐️⭐️ | Base stat: 44–565 Elemental Mastery 24–110 | Elemental Reactions with Dendro create a Leaf of Revival that lasts 10 seconds next to the character. The Leaf increases the attack power of the hero who picks it up by 16-32% for 12 seconds. Any character from the squad can pick up the Leaf of Revival. The effect does not trigger more than once every 1 seconds. The weapon is useful not only for the team, but also for the heroine herself, as it helps in creating more powerful reactions. |
| 8 |  Missive Windspear Missive Windspear | ⭐️⭐️⭐️⭐️ | Base stat: 42 - 510 ATK 9%-41,4% | Within 10 sec. after activating an elemental reaction, ATK is increased by 12-24%, and elemental mastery by 48-96. Free event spear (not currently available). Although it will be of great benefit for invoking the Growth reaction, a passive increase in elemental mastery will also be useful for Blooming, Burning. |
| 9 |  The Catch The Catch | ⭐️⭐️⭐️⭐️ | Base stat: 42 - 510 Energy recharge 10%-45,9% | Elemental burst damage is increased by 32 %, and the critical chance for the ultimate is increased by 12 %. Can be obtained for free with fishing. Unlike all the previous options, this spear is worth considering if you want to increase the damage from the ult. In some cases, this is just what's needed, since her elemental burst is expensive (80 energy) and as a support DD, most of her damage comes from this skill. |
Useful artifacts
Artifacts for Yaoyao must match the purpose she fulfills in the team.
Artifacts for the role of a healer
For example, for a heal or a full support, sets with bonuses of healing, HP and buffs for the squad are suitable.
| number | Name | The set is | Rarity | Passive Effects |
|---|---|---|---|---|
| 3 | Song of Days Past |  | ⭐️⭐️⭐️⭐️ ⭐️⭐️⭐️⭐️⭐️ | 2 parts: Increases healing bonus by 15%. 4 parts: Equipped character when healing squad members for 6 sec. creates the Yearning effect that registers the healing performed (including excess). When the duration ends, Yearning turns into Waves of Days Past: When your active character hits an enemy with a Normal Attack, Charged Attack, plunging Attack, Elemental Skill, or Elemental Burst, the damage dealt is increased by 8% of the total amount of healing registered by Yearning. After 5 activations or after 10 sec. the effect of the Waves of those times disappears. A one-time effect of Yearning registers up to 15 HP. Only one Yearning can exist at a time, but it can register healing provided by multiple equipped characters at once. This effect activates even if the equipped character is not on the battlefield. A good set for the damage bonus of one of the main damage dealers. The passive ability works based on the amount of healing received by all allies, and the damage bonus applies to the attacking abilities of the active character. |
| 1 | Ocean-Hued Clam |  | ⭐️⭐️⭐️⭐️ ⭐️⭐️⭐️⭐️⭐️ | 2 Piece: Increases healing bonus by 15%. 4 Piece: When healing allies, the owner of the set creates a Sea-Dyed Foam that records the healing statistics (even when the accumulation of health points is excessive when the target has maximum HP). When it expires, the Sea-Dyed Foam explodes, dealing 90% damage (including potential) of HP restored to enemies. The Sea-Dyed Foam appears no more than once every 3,5 seconds, and its damage is calculated according to the effects of Charged and Superconduct, but cannot be enhanced by elemental mastery, a level bonus, or other reactions. A versatile healer set that also allows you to deal additional damage after the Sea-Dyed Foam explodes. |
| 2 | Tenacity of the Millelith |  | ⭐️⭐️⭐️⭐️ ⭐️⭐️⭐️⭐️⭐️ | 2 Piece: Increase character's HP by 20%. 4 Piece: When an elemental skill hits enemies, all party members' ATK is increased by 20% and their shields are increased by 30% for 3 seconds. The effect lasts for 3 seconds and can occur once every 1 seconds. The buff is activated even if the wearer of the set is not on the battlefield. Provides a health boost, which is used to heal, while also boosting the squad with an elemental skill. The heroine can maintain the set bonus, as her E deals periodic damage from off-field. |
| 4 | Maiden Beloved |  | ⭐️⭐️⭐️⭐️ ⭐️⭐️⭐️⭐️⭐️ | 2 Piece: Increases the effectiveness of healing by 15%. 4 Piece: After activating an elemental skill or character's ult, the received healing of all party members is increased by 20%. The effect lasts 10 seconds. A set aimed exclusively at healing. Does not buff the team in any way and does not deal additional damage, but increases the effectiveness of the heal after using abilities. |
| 5 | Ocean-Hued Clam / Maiden Beloved / Tenacity of the Millelith | | ⭐️⭐️⭐️⭐️ ⭐️⭐️⭐️⭐️⭐️ | If it is not possible to get a full set, you can use the above sets XNUMX+XNUMX. |
| 6 | Noblesse Oblige |  | ⭐️⭐️⭐️⭐️ ⭐️⭐️⭐️⭐️⭐️ | 2 Piece: Increases elemental burst damage by 20%. 4 Piece: Activating an elemental burst increases the attack power of all party members by 20% for 12 seconds. The effect does not stack. The best option for almost any support. It will increase the damage from the elemental burst and at the same time the attack power of all teammates. |
Artifacts for a sub-dd
For the sap-dd role, it is recommended to consider sets that give EM or elemental bonus.
| number | Name | The set is | Rarity | Passive Effects |
|---|---|---|---|---|
| 1 | Deepwood Memories |  | ⭐️⭐️⭐️⭐️ ⭐️⭐️⭐️⭐️⭐️ | 2 Piece: Increase Dendro damage by 15%. 4 Piece: Hitting with an elemental skill or elemental burst reduces enemy Dendro resistance by 30% for 8 seconds. The effect works even if the character is not on the battlefield. If no one in the squad uses this set, you can put it on a character. This will allow her to do more damage by cutting off resistances, and boost other allies who deal plant damage. |
| 2 | Gilded Dreams |  | ⭐️⭐️⭐️⭐️ ⭐️⭐️⭐️⭐️⭐️ | 2 parts: +80 elemental mastery. 4 parts: For 8 sec. after triggering an elemental reaction according to the elements of other characters in the squad, the equipped character receives the following buffs:
A versatile set that will suit a squad that plays through any Dendro reactions. Significantly increases elemental mastery (great for Blooming, Burning), as well as ATK, which affects skill damage and the power of the Spread reaction. |
| 3 | Flower of Paradise Lost |  | ⭐️⭐️⭐️⭐️ ⭐️⭐️⭐️⭐️⭐️ | 2 Piece: +80 elemental mastery. 4 Piece: Increases the damage dealt by Bloom, Hyperbloom, and Burgeon by 40% on the character equipped with this set. If the wielder triggers these reactions on their own, the effect will increase by another 25%. Each summation lasts 10 seconds. The effect stacks up to 4 times, occurs once every 1 seconds, and activates even if the character is not active. Set for Blooming. If the girl is playing in a squad with Hydro, this is one of the best options, which will increase the damage of this reaction to 65%. |
| 4 | Flower of Paradise Lost / Gilded Dreams / Deepwood Memories | | ⭐️⭐️⭐️⭐️ ⭐️⭐️⭐️⭐️⭐️ | Alternatively, two-part combinations can be used for a bonus to Elemental Mastery or Elemental Damage. |
| 5 | Emblem of Severed Fate |  | ⭐️⭐️⭐️⭐️ ⭐️⭐️⭐️⭐️⭐️ | 2 Piece: Increases Energy Recharge rate by 20%. 4 Piece: Increases elemental burst damage by an amount equal to 25% of ER. Max bonus is 75%. Let's highlight this set separately. It doesn't affect reaction damage in any way, but considering that the ult costs 80 energy, and in the support-dd position she deals damage with most of the ult, this is also a completely viable option. |
Teams
Yaoyao's teams generally consist of heroes that require Dendro Reactions, Healing, Resonance, or trigger Reactions.
Recommended characters
Partners who interact effectively with the heroine:
| Character | Element | Weapon | Effects |
|---|---|---|---|
 Dendro Dendro |  One-handed sword One-handed sword | In a squad with Alhaitham, the heroine can cover the healer slot, provide resonance, and also increase Dendro damage by 1% at C15. | |
| Dendro |  Catalyst: Catalyst: | Nahida will allow you to replenish energy faster and increase your elemental mastery to 250. In turn, the girl will heal and deal damage from off-field if necessary. | |
 Tighnari Tighnari | Dendro |  Bow Bow | A main damage dealer that also needs resonance and healing, especially when playing through Bloom. |
 Dendro Traveler Dendro Traveler | Dendro | One-handed sword | Increases Elemental Mastery, which is useful for reactions, and his C6 synergizes well with her C1, as it also provides a bonus to elemental damage, giving them a combined buff of 27%. |
 Collei Collei | Dendro | Bow | Dendro sub-dd with area damage. Increases Elemental Mastery at C4. |
 Cyno Cyno |  Electro Electro |  Polearm Polearm | Works great with any Dendro character that deals damage from off-field. In addition, he will need healing in his ult stance. |
 Yae Miko Yae Miko | Electro | Catalyst: | Can be both as a reactor and as a source of constant Electro status to create Quicken reactions. |
 Raiden Raiden | Electro | Polearm | A good combination in revolver teams. With Raiden's help, she will start gaining energy much faster. |
 Keqing Keqing | Electro | One-handed sword | Electro infusion, which the heroine receives from the passive talent after using the E, makes it possible to consistently trigger the Aggravate reaction. |
 Beidou Beidou | Electro |  Claymore Claymore | Her elemental burst creates electrical circuits around herself (or the active character), which impose a status on enemies on hit. |
 Fischl Fischl | Electro |  Bow Bow | Electro sub-dd. May also trigger reactions when inactive. |
 Nilou Nilou |  Hydro Hydro | One-handed sword | Since Nilou only plays with Dendro and Hydro in the classic build, the girl will fit perfectly into her team as a healer. |
| Hydro | One-handed sword | Furina plays well with healers as they allow her buffs to work. In addition, he deals excellent damage without entering the field. | |
 Tartaglia Tartaglia | Hydro | Bow | While Tartaglia is in his stance, he needs sources of pocket damage to trigger reactions. |
 Ayato Ayato | Hydro | One-handed sword | If Ayato plays through Blooming, the heroine can be used as an applicator and a healer. |
 Xingqiu Xingqiu | Hydro |  One-handed sword One-handed sword | Work together in squads through Blooming, Hyperbloom and Burgeon. |
 Yelan Yelan | Hydro | Bow | Just like Xingqiu, he is one of the best characters for constant Hydro status and extra damage. |
 Mona Mona | Hydro |  Catalyst: Catalyst: | Universal sub-dd and buffer for any situation. |
 Diluc Diluc |  Pyro Pyro |  Claymore Claymore | Basic Pyro dd. If playing from Blossom, where the characters also take damage, he needs a healer. In case there is no Kokomi, and Barbara is in another squad or is not leveled, you can use Yaoyao. |
 Yoimiya Yoimiya | Pyro | Bow | Yoimiya is a rather fragile character who definitely needs either a shielder or a healer. If she plays in the Dendro squad, Yaoyao will be a good partner for her. |
 Klee Klee Yanfei Yanfei | Pyro | Catalyst: | Thanks to the built-in infusion, they play well in any squads from reactions, including those with Dendro. |
 Thoma Thoma | Pyro | Polearm | A shielder that can deal periodic Pyro damage outside of the battlefield for the Burning or Burgeon reactions. |
 Xiangling Xiangling | Pyro | Polearm | Unlike Thoma, she doesn't have a shield, but deals more damage and gives more status. Plus, she's a free character. |
Samples of strong groups
Squads that can be formed based on the above heroes:
| Character 1 | Character 2 | Character 3 | Character 4 | Features |
|---|---|---|---|---|
| Beidou |  Zhongli Zhongli | Spread Group with Alhaitham. Beidou's ult allows her normal attacks to trigger a reaction with Electro. Yaoyao heals, deals additional damage and triggers the Dendro resonance. Zhongli gives additional protection and lowers the resistances of enemies. | ||
| Raiden |  Mona Mona | Alternate Hyperbloom squad. Raiden, using an elemental skill, allows Alhaitham to create a reaction. Mona casts Hydro and increases all damage dealt with her ultimate. Yaoyao heals after exploding cores from Blooming. | ||
 Xingqiu Xingqiu Yelan Yelan | ThomaXiangling | A team focusing on the Burgeon reaction. Xiangling deals more damage and casts more Pyro. While Thoma does it less actively, but provides a shield, which is useful if the healing from Yaoyao is not enough. | ||
 Nilou Nilou |  Xingqiu Xingqiu | Collei | Classic, budget squad with Nilou through Blooming. Yaoyao in this case can wear the Flower of Paradise Lost and trigger the reaction, being in the state of the Adeptal Legacy (elemental burst). | |
| Nilou |  Mona Mona Kokomi Kokomi | More expensive build with Nahida and Mona. If the healing from Yaoyao is not enough, Kokomi or Barbara will go well in the last slot instead of Mona. | ||
| Tighnari | Fischl |  Sucrose Sucrose | Squad through Spread with Tighnari. Yaoyao is a great support for Tighnari, especially with the 1st constellation for the Dendro damage bonus. Fischl provides Electro damage out of the battlefield, Sucrose pulls and increases elemental mastery. | |
| Cyno | Raiden | Aggravate team with Cyno. Yaoyao and Nahida form a Resonance that grants a bonus to Elemental Mastery. Raiden helps replenish energy for the squad, provides status and additional damage. | ||
| Cyno |  Candace Candace | Raiden in the previous group can be replaced with Candace/Furina, which will add new reactions - Blooming and Burgeon, and will also increase the elemental damage of regular attacks or the entire damage dealt by the team. Yaoyao also serves as a healer. | ||
| Keqing | Mona | Dendro MCCollei | Hyperbloom team with Keqing. Since her ult is inexpensive, the second Electro is optional, but the Dendro resonance for such a reaction, on the contrary, is not superfluous. Mona, if necessary, can be replaced with Electro sup-dd to remake the squad into an Aggravate one. In this case Keqing will also need crits and attack power. | |
| Raiden | Xingqiu | Xiangling | Variation of the national tean with Yaoyao. Unlike the classic build with Bennett, in such a squad, Raiden is not going into crits and attacks, but into elemental mastery. | |
| Ayato | Yae Miko | Blooming/Hyperbloom Squad with Ayato. This team can continuously trigger reactions, dealing heavy damage to a group of enemies. | ||
| Tartaglia | Beidou | Tartaglia can work on the same principle. As an alternative to Yae Miko, Beidou comes in well. However, her ult is expensive, so it is advisable to have a Favonius weapon for her if there is no second Electro. | ||
| KleeYanfei | Collei | YelanXingqiu | Hyperbloom tean with Klee/Yanfei. These characters are quite convenient to trigger reactions, as they are catalysts and have their own infusion. Collei and Yaoyao support Dendro status, Xingqiu / Yelan apply Hydro and deal additional damage from the ult. |
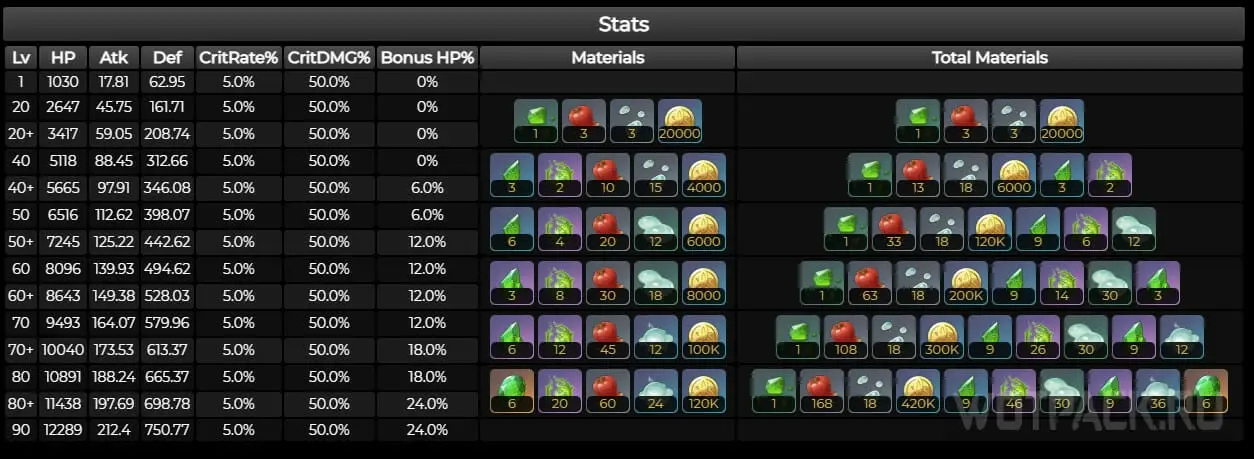
Extra Stats For Leveling
The character's main stat is HP % (health). This value increases along with the character's levels. Along with it, such characteristics as attack power, defense and flat HP increase. The exact values are shown in the table below.
| Level | Base HP | Basic attack | Base DEF | HP% |
|---|---|---|---|---|
| 1 | 1030 | 18 | 63 | 0 |
| 20 | 2647 | 46 | 162 | 0 |
| 40 | 5118 | 88 | 313 | 0 |
| 50 | 6516 | 113 | 398 | 6.0 % |
| 60 | 8096 | 140 | 495 | 12.0 % |
| 70 | 9493 | 164 | 580 | 12.0 % |
| 80 | 10891 | 188 | 665 | 18.0 % |
| 90 | 12289 | 212 | 751 | 24.0 % |
Leveling
This section lists all the resources required to upgrade the heroine to the maximum level.
Ascension
Source: honeyhunterworld.com
The following components are required for ascension:
- Slivers, fragments, chunks and gemstones of Nagadus Emerald. If you need more stones, you can recraft them with Dust of Azoth.
- Jueyun Chili – Liyue specialty.
- Slime Condensate, Slime Secretions, Slime Concentrate - dropped by slimes.
- Quelled Creeper - material dropped by the world boss Dendro Hypostasis.
- 420.000 Mora and 421 Hero's Wit.
Talents
Source: honeyhunterworld.com
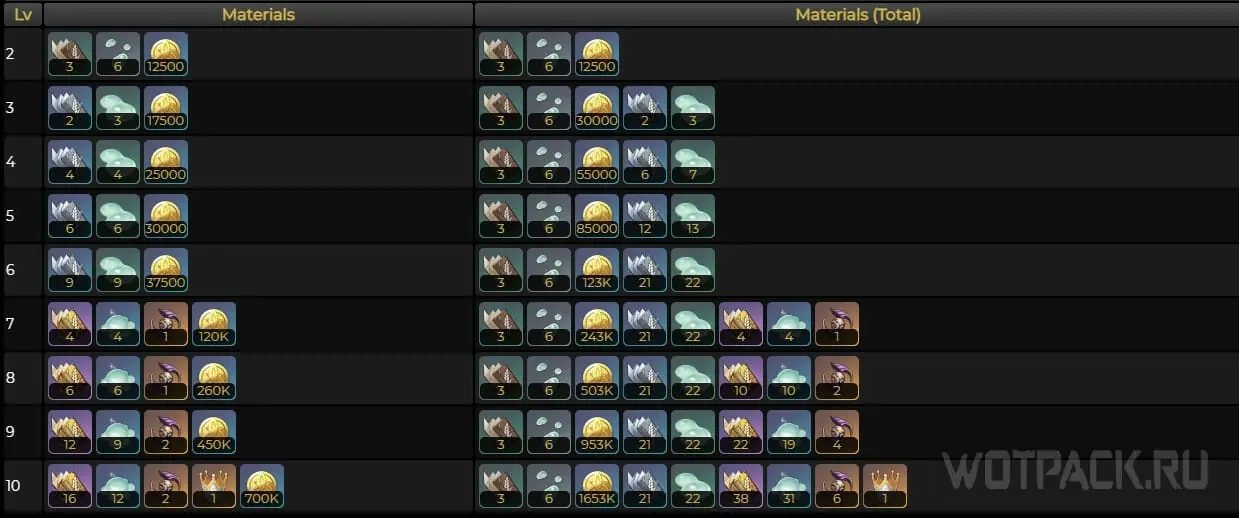
In order to upgrade talents, in addition to Slime Condensate, Slime Secretions and Slime Concentrate, you will need:
- Diligence Talent Books - Dropped in the dungeon Taishan Mansion on Tuesday, Friday and Sunday.
- Daka's Bell - Weekly Boss Item, dropped by Shouki no Kami.
- Crown of Insight for the 10th level of talents (3 pcs).
- 1.650.000 Mora.
Skills
The skills of the Adepti apprentice allow her to heal characters and at the same time deal damage depending on the current situation on the battlefield. The spear wielder also has quite useful passive talents and constellations in her reserve that can help the team both in the open world and during battle.
Basic (Active) Skills
Toss 'N' Turn Spear
- Source of damage: ATK.
Normal attack: Performs up to 4 quick spear strikes.
Charged Strike: makes a dash forward, consuming stamina.
Plunging Attack: A rapid flight to the ground with area damage upon landing.
Raphanus Sky Cluster
- Cooldown: 15 seconds
- Source of damage: ATK.
- Healing source: HP.
Calls to her aid the invention of the Adepti, Yuegui. When tapped, she immediately throws it forward, while holding the skill, she is able choose the direction of the throw.
Yuegui: Throwing Mode:
- Periodically throws a white jade radish that explodes after hitting enemies or heroes, then deals Dendro damage in a specific area and restores health in the same area based on the maximum HP.
- If the radish does not hit enemies or heroes, it remains in place and exists on the battlefield until it is touched by an enemy/character or 5 seconds have passed.
Targets for White Jade Radish are chosen based on the situation:
- If nearby allies have more than 70% HP, the enemy becomes the target.
- If allies have less than 70% HP, the hero with the least HP is targeted.
- If there are no enemies nearby and all allies' health is over 70%, the throw is still made at the heroes.
At the same time, no more than 2 Yuegui can be present on the field.
Moonjade Descent
- Duration of the Adeptal Legacy: 5 seconds
- Cooldown: 20 seconds
- Enegry consumption: 80.
- Source of damage: ATK.
- Healing source: HP.
Releases all of Yuegui's power, dealing elemental damage to nearby enemies and gaining a partially invulnerable state of Adeptal Legacy:
- White Jade Radish is modified to either damage or healing.
- When the radish explodes, it deals damage and restores even more HP to all nearby allies.
- Summons Yuegui: Jumping Mode at some intervals until their number reaches 3. The principle of their operation is the same as that of Yuegui: Throwing Mode elemental skill.
- At this point, movement speed increases by 15% and Dendro resistance increases by 50%.
If the girl leaves the battlefield while the Adeptal Legacy is in effect, the effect will be interrupted and all the Yuegui: Jumping Mode will disappear.
Passive Skills
Tailing on Tiptoes
When the heroine is in a party, characters no longer scare away crystal butterflies and some other types of animals. Check the "Other" sub-category of the "Living Beings / Wildlife" section in the Archive for creatures this skill works on.
Starscatter
In the Legacy of Disciples state, she throws White Jade Radish at enemies every 0,6 seconds while running, sprinting, and jumping.
In Others' Shoes
White Jade Radish restores health to characters in the explosion area every second proportional to 0,8% of their maximum HP. The effect lasts for 5 seconds.
Talent Leveling Order
In any position, abilities are the key source of damage, buffs, and healing. The leveling priority is as follows:
- Support Healer: elemental skill > ult > normal attack.
- Sub-dd reactor: ult > elemental skill > normal attack.
Normal attacks in both cases can either not be upgraded at all, or left at level 6.
Constellations
| number | Name | Effects |
|---|---|---|
| 2 | Innocent | When the heroine is in the state of the Adeptal Legacy (ultimate) and the explosions of the White Jade Radish deal damage to enemies, she restores 3 energy to herself 1 time per 0,8 seconds. |
| 4 | Winsome | After activating an elemental skill or ult, elemental mastery increases proportionally to 0,3% of her max HP for 8 sec. Max EM bonus is 120. |
| 6 | Beneficent | Every third throw of a White Jade Radish has a 100% chance to spawn up to 2 additional Mega Radishes with a larger area of effect and the following effects:
|
| 1 | Adeptus' Tutelage | Active characters in the explosion area of the White Jade Radish receive:
|
| 3 | Loyal and Kind | Increases the skill level of Raphanus Sky Cluster (elemental skill) by 3. Max. Lvl: 15 |
| 5 | Compassionate | Increases the skill level of Moonjade Descent (Elemental Burst) by 3. Max. Lvl: 15 |
Best constellations of Yaoyao are С1, С2 and С6:
- The first constellation is one of the most useful in terms of support, as it gives a bonus to elemental damage and restores stamina points to active heroes in the White Jade Radish explosion zone.
- The second constellation allows you to solve the problem with the expensive ult and restore energy right during the action of this skill.
- The sixth increases potential as a healer, and gives the ability to deal some additional area damage depending on ATK.
How to play Yaoyao
Yaoyao's abilities combine several functions at once: heal, deal damage from off-field, distribute status or trigger the reaction. In general, when building her, you can focus on both full support (healer) and support-dd (reactor). At the same time, not only the builds differ, but also the styles of play, since the mechanics of the elemental burst do not allow the heroine to leave the battlefield. Let's consider the gameplay using two basic builds as an example.
Full Support Rotation (Healer)
In this case, the student of the Adepti is minimally present in the arena, playing only the role of a healer or buffer in the presence of certain constellations, artifacts or weapons. It is worth noting that in such a build, the heroine works best in a team with one main DD and supports, and not in "revolvers" (squads with several damage dealers), since she heals only one active companion.
The support rotation looks like this:
- Activate the elemental skill, targeting the nearest enemy. This will create Throwing Yuegui, which will throw White Jade Radish at the enemies, causing them to explode.
- Switch to the main dd, and while Yuegui exists, attack for 10 seconds. If during this period HP reaches 70% (and below) or there are no enemies nearby, the hero will begin to heal after the explosion.
- Repeat steps 1-2 until the ult is built up, then activate it and wait for the Yuegui to throw the White Jade Radish.
- Switch back to the main DD and, being in the explosion area, receive increased healing. At the same time, damage is also inflicted on enemies.
Rotation for sub-dd reactor
As a sub-dd, the girl no longer leaves the battlefield after she activates the elemental burst. Rotation for creating reactions:
- Use the pocket abilities of other supports or sub-dds.
- Switch to the student of the Adepti and activate the elemental skill towards the opponents.
- Switch to the main dps and attack the enemies for 10 seconds until Yuegui disappears.
- Repeat steps 1-3 until you have your ult. Before using it, use skills of other supports again, making sure there are sources of Electro, Hydro or Pyro in the arena to trigger reactions.
- Activate the ultimate and start running around the enemies, periodically pressing jump and dash to throw additional Radishes (passive talent Starscatter).
Character Summary
Yao Yao is a hero who combines several roles in Genshin Impact: healer, reactor (response canceler), applicator (status inflictor), support damage dealer, and even a C1 buffer. This is her strength, but it also complicates her build. For example, healing requires HP, while skill damage is affected by ATK. Her ultimate is extremely expensive, requiring energy regeneration (and the player cannot leave the battlefield while using her ultimate), and creating stronger reactions requires MS.
Thus, she came out as a versatile support, which is both a plus in terms of flexibility and a minus in terms of stat and equipment selection. If the squad simply needs a Dendro healer and applicator, she will cope with this role perfectly without any special conditions.


Hello, how realistic is the instructor's set on Yao Yao in a squad with Fischl, Sukharoz, and Clorinda?
Hello! A good choice: the Electro Status from Clorinda and Fischl is enough to ensure Yao Yao activates her reaction every time. The only thing is that the healing might be lacking, as this is still a 4-star set, and it provides fewer stats. It's better to get the flowers from a 5-star set, and everything else from the instructor.
Hello, why is the third item in the artifacts list in first place?
A pack of Keqing (C1 Thunder Roar + Gladiator’s Finale Black Sword), Fischl (C2 Thunder Roar + Gladiator’s Finale Skyward Harp), Yao Yao (C2 Vozlyub Yun Dev Black Brush), and Kolley (C2 Gladiator’s Finale + Stringless Strangers). What weapons and artifacts are best? Is the pack normal?
Squad Nefer, Lauma, Columbine, Yao Yao - Lauma in Dendro set, and Columbine in Serenade.
What artifact set should I use on Yao Yao?
I was thinking that I could put together a hodgepodge of HP + HP or Healing Bonus + Healing Bonus for her, but now I can’t decide.
Nefer has a Nod-end crafting catalyst, Lauma has a Lute, Columbine has a Prototype Amber, and Yao Yao has a Favonia/Blackbrush.
Colleagues, I'm thinking of putting her in a stack of Nefer, Lauma, Columbine, and YaoYao (I'm currently using Barbara). Should I buff her or not? I'm also looking for suggestions on artifacts: a Dendro set with a HP% boost or something that increases healing. I'm planning on using Favonius for her spear.