

В Genshin Impact Anemo support Sucrose focuses on elemental reactions, increasing her allies' Elemental Mastery based on her own strength. Thanks to her element, she can wear the Viridescent Venerer set and reduce enemy resistance to the Inflated Element, and with a sixth Constellation and a closed resonance of Witchcraft - distribute a bonus to elemental damage and damage to all squad members' buttons
Alchemist's Apprentice is most effective in Steam, Meltdown, Charged, and especially Lunar Charge, where there are no alternatives. Despite her epic rarity and long-standing release, she still finds easy use on almost every account.
| Rating | S+ position in tier lists |
| Rarity | ⭐️⭐️⭐️⭐️ |
| Appeared in-game | September 28, 2020 (patch 1.0) |
| How to get | Character Event Wish and Standard Wish |
| Element | Anemo🌪️ |
| Weapon | Catalyst |
| Gender | Female |
| Affiliation |
|
| Constellation | Ampulla |
| Home region | Mondstadt |
| Birthday | November 26 |
| Zodiac sign | Sagittarius |
| Age | 15-17 years old |
| Height | 155-160 cm |
| Special dish | Nutritious Meal (V.XNUMX) |
| Voice Actors |
|
How to Get the Character
 Sucrose can be obtained from event banners, when they have an increased drop rate, or randomly from standard and weapon banners. Obtaining constellations requires obtaining duplicates of the heroine.
Follow the character release schedule on the following page: banner schedule.
Strengths and Weaknesses

Thanks to her Elemental Mastery boost, she's an indispensable Anemo support, as no other support companion can boost this stat as effectively. She's carved out a special niche in the Lunar Reactions meta, where she's a top-tier Wind ally and a key player for many Arcane Rite teams. Investing in her is profitable on virtually any account, and her main advantage lies in constellations.
| Strengths | Weaknesses |
| Universal A support character for squads through reactions thanks to the MS buff and the Anemo element, which allows you to cut down enemy resistance due to the Viridescent Venerer. | In almost all "classic" groups, except for Lunar Charge and teams where she acts as a key support for closing Magic Resonance, Ronin Kazuha stronger. |
| It has a powerful area screed, allowing you to control and gather small enemies into a group. | Highly desirable C1 for double pressing E-key, especially if you're not using Ceremonial Memoirs. Without the First Constipation, energy recovery requirements increase by 30-40%. |
| Easy to build, since in artifacts and the catalyst it is enough to look for only two stats, and her best weapon is of epic rarity. | Screed doesn't work on bosses and does not throw up large enemies. |
| A handy passive that helps you save items for Alchemy. |
The Best Sucrose Builds in Genshin Impact

On the battlefield, she plays the role of a support character, emerging from the pack after her teammates and using her abilities on enemy elemental statuses to trigger the Disperse reaction, inflate the elements, and absorb them with her ultimate. She primarily buffs her allies' MS based on her own MS, which is why Sucrose's build requires maxing out this stat.
Recommended Stats
The watch, chalice, and crown should be chosen only for Elemental Mastery. Energy regeneration should be considered in substats, as the ultimate is quite expensive but crucial for a good fight, especially with C6 unlocked. If you're using the Codex of Favonius as a weapon, you'll need Critical Chance in your secondary stats to be able to critically hit and generate Energy Motes.
The table shows the characteristics required for each artifact:
| Artifact | Stats |
 Flower of Life Main Stat: HP (fixed) |
Substats:
|
 Plume of Death Main Stat: ATK (fixed) |
Substats:
|
 Sands of Eon Main Stat: MS or VE% |
Substats:
|
 Goblet of Eonothem Main Stat: Elemental mastery |
Substats:
|
 Circlet of Logos Main Stat: Elemental mastery |
Substats:
|
Optimal stat values, which may vary depending on const and equipment:
- Elemental Mastery: about 800-1000 units. Upon reaching 1000 units of MS, the girl will be able to give 200 units of mastery to allies.
- Energy recharge: 200%-230% if there is no C1, 170%-190% if there is C1.
- If the Favonius Codex is used, you need to have at least 40-50% Crit chance.
Weapon Tier List
Catalysts with MS as their primary stat are prioritized. In cases where artifacts lack HE% or teams with expensive ultimates, energy restoration options are beneficial, and for allies with ATK scales, books with support passives are beneficial.
| Name | Description | Recommendation |
 |
After dealing damage with an E, there is a 40%-80% chance to reset its cooldown. The effect occurs once every 30-16 sec. | The most useful catalyst option, it resets the skill's cooldown, allowing it to be used multiple times. It increases its potential as a battery and allows Sucrose to be harvested at a lower VE%. |
 |
Gives buffs when switching characters. Increases the attack power of the hero who enters the battlefield by 24%-48% for 10 sec. once every 20 sec. | You can use it if the ATK stat is important for the hyper-carry, but only with an open C1 and a decent VE% value, otherwise it won’t be enough for the ultimate on cooldown. |
 |
Every 10 sec. increases the wielder's attack power by 24%-48% of their elemental mastery for 12 sec. Allies receive 30% of this effect. | One of the best support options, especially on awakenings. Suitable for groups with attack damage dealers. Works great in a Lunar Charge group with light-bearer Kirill и robot Ineffa, since, unlike the option above, it strengthens all team members at once, and not just one specific one. |
 |
Critical hits once every 12-6 sec. have a 60%-100% chance to create particles that restore energy to allies. | Since the required VE% threshold is easier to reach than MS, this option isn't as popular as others due to its energy regeneration stat. It's best used in situations where allies have trouble generating energy for their ultimates. |
 |
When the wielder causes an Electro reaction, characters of the same element receive 10%-20% Elemental damage bonus for 6 sec. | This is a highly specialized loadout due to its Electro-specific nature. The bonus can only be activated with an E-shot when not in the pocket, requiring frequent hero switching and not suitable for every squad. It's not recommended for Lunar Charge, as this type of reaction doesn't benefit from the elemental damage boost. |
 |
After activating Swirl, increases Elemental Mastery for 6 sec. by 120-240 . After hitting with an elemental skill, increases EM by 96-192 for 9 sec. After hitting with an elemental burst, increases EM by 32-64 for 30 sec. | Better suited for a driver role than a pocket support, as the first part of the buff only lasts 6 seconds. It provides a huge amount of Mana Shield, but typically, a lower Mana Shield and the presence of a support passive, like the gear above, yield better results. |
 |
The elemental mastery of other characters increases by 40-48 . Gives buffs depending on the elements of the allies of the catalyst wielder. If they match, then elemental mastery increases by 32-64 . If not, the wielder receives a 10%-26% elemental damage bonus. Effects can stack up to 3 times. | Although the gear is of legendary rarity, it's not the best choice and is only considered for its substats. In most groups, the Alchemist's Apprentice is the only Anemo in the team, so she'll receive a bonus to elemental damage rather than MC. |
 |
Increases Elemental Mastery by 100-200 . When the wielder creates a shield, once every 14 sec. the Mirror of Night effect is activated for 15 sec.: the active character's damage is increased by 28%-56%. | An alternative version of the legendary weapon. Although the girl is unable to create shields, this catalyst can be given to her due to its huge stat boost. |
 |
After calling a reaction for 10 seconds. increases elemental damage by 8%-16%for 2 sec. The effect stacks up to two times. | A crafting book from Mondstadt. It's useful due to its availability and can be used even at low ranks. There's no point in awakening it, as the passive won't benefit the heroine. |
 Magic Guide
⭐⭐⭐ Base ATK: 38-354 Elemental Mastery: 41-187 |
Increases damage against enemies with Hydro and Electro effects by 12%-24%. | 3 ⭐ A catalyst for beginners, which can be installed if better books are unavailable. Works well with the Zaryazhen group driver variation. |
Equipment that is effective for other characters has been dismantled in weapon tier list.
Top Artifacts
Sucrose's artifacts should primarily address the needs of the entire group and serve a supportive role. Due to her element and role, the choice is limited to only two possible builds. Any other builds should be avoided due to the lack of synergy with her abilities.
| Name | The effect | Description |
 Viridescent Venerer |
2-Piece Bonus: Increases Anemo damage by 15%. 4-Piece Bonus: Increases Swirl reaction damage by 60%. Reduces the enemy's resistance to the second element in Swirl by 40% for 10 sec. |
A top-tier option with no alternatives. Worth picking for both pocket support and driver. |
 Instructor |
2-Piece Bonus: Increases elemental mastery by 80. 4-Piece Bonus: Calling a reaction increases the elemental mastery of party members by 120 for 8 sec. |
A rare alternative solution for groups where Dispel is not needed, such as with a boss Curatorium of the Secrets of NeferCan be given to a character if the party already has an Viridescent Venerer bearer or if the specified set cannot be collected. |
Teams

Sukharoz excels in teams with characters from different elements. Her party should definitely include Pyro, Hydro, Cryo, or Electro applicators to boost her ultimate's absorption. Since she specializes in Elemental Mastery buffs, she needs such allies and, unlike Kazuha, is less useful in single-element teams.
Optimal characters
She has the best synergy with heroes from Steam, Melt, and Moon Charge reactions, as well as companions with the Witchcraft status.
Witchcraft: The Secret Rite
Satellites capable of blocking magical resonance:


Damage dealers
Teammates who provide damage on the field and from the pocket:


Supports
Several heroes that provide healing, shields, or buffs:



Examples of strong teams
With Magical Resonance active, her abilities don't change dramatically, but are simply supplemented by a buff and an additional bonus to her ultimate on top of the base bonus. It's a nice bonus, but it's not always worth focusing solely on Witchcraft groups, neglecting "normal" compositions.
Vaporize
Teams with a fire or water main DD:
| Character 1 | Character 2 | Character 3 | Character 4 | Features |
|---|---|---|---|---|
 Neuvillette |  Durin  Fischl |  Sucrose |  Furina | A powerful unit for Judex, combining the resonance of the Sabbat. In this variation, the alchemist girl will deal additional damage to all allies, and you can choose either Durin or Fischl as a second companion. The princess will increase the team's MS after activating Charged, and the dragon will compensate for the lack of buffs with his own damage. It's best to use it on Sucrose. Prototype Amber, to somehow compensate for the lack of a healer. |
 Mualani | Durin Mavuika | Sucrose |  Xilonen | A squad variation for the Folk of Wellspring guide. Due to the nature of Mualani gameplay, the occasional status infliction from Durin or Mavuika won't be a major issue. Sucrose and Shilonen will provide both with their buffs, ensuring a smooth progression. |
 Tartaglia  Ayato | Durin Xiangling | Sucrose |  Nicole  Bennett | It's better to paint the ult into Pyro, buffing Durin or Xiangling, since they are the ones who cover reactions, and the Hydro hero is closer to the driver role than the main damage dealer, and the main damage does not come from them. |
 Klee  Arlecchino |  Yelan  Xingqiu | Sucrose | NicoleBennett | Replacing a Hydro partner with someone else, such as Furina, is not recommended due to its insufficiently "dense" status. A combination with Klee is optimal due to the mutually beneficial Witchcraft, but Harlequin is also an option. |
| Durin | FurinaYelanXingqiu | Sucrose | NicoleBennett (C6) | The MS Bay favors Steam play, so if you lack a main DPS and have a C6 Bennett, you can use Durin in this spot. The dragon attacks from the right hand and, depending on the Hydro sub-DPS chosen, triggers their ultimates or simply deals additional fire. |
Melt
| Character 1 | Character 2 | Character 3 | Character 4 | Description |
|---|---|---|---|---|
 Ayaka  Lohen |  Shenhe  Rosaria  Charlotte | Sucrose |  Mona | If you know how to play carefully, it's better to equip a healing catalyst on Mona. Prototype Amber And don't take Charlotte, who's worse at pumping energy than her alternatives. A C6 level is highly recommended for the alchemist's apprentice. |
 WriothesleyLohen | DurinXiangling | Sucrose | Bennett | The ultimate should be tinted with an Ice element to provide a more consistent status effect on enemies for Durin fighting in Dark Stance. Replacing the dragon with Xiangling is possible, but the loss of Arcane Rite will make the effect weaker. |
| Klee | Rosaria | Sucrose | Bennett | Rosaria covers the reactions, so she needs to take MS during the clock and reset her ultimate strictly within Bennett's field to get the attack damage bonus. It's impossible to replace her with another Cryo sub-DD, as others have different status mechanics. |
 Hu TaoArlecchino | Durin | Sucrose |  Citlali | Sucrose and Durin reduce elemental resistances, while Sitlali provides survivability and a Cryo effect on enemies. In such a team, it's essential to first trigger the Pyro Dispersal reaction after activating the dragon's ultimate. This will reduce resistance to Anemo and Pyro, opening the door for damage dealers. |
Mono-Pyro and Overload
Outside of magical resonance, these reactions are quite weak, so it's important to maintain it. Otherwise, replacing the alchemist's apprentice with Kazuha or Chevreuse would be much more profitable.
| Character 1 | Character 2 | Character 3 | Character 4 | Recommendation |
|---|---|---|---|---|
 Varka | Sucrose | DurinMavuikaXiangling | NicoleBennett Thoma | Sucrose independently closes the Witchcraft Resonance, so any Pyro sub-DD can be added to the third slot. Varka can also play with Cryo, Hydro, and Electro, but Fire-based lineups are much stronger, especially when a premium team isn't an option. |
KleeArlecchino Lyney | DurinMavuikaXiangling | Sucrose | BennettXilonen | If you're using Klee, you can replace Durin with Mavuika or Xiangling; otherwise, he's essential for Magic Resonance to work. Bennett is a better choice, as the resistance cut is already in place. |
| KleeArlecchino | Fischl | Sucrose | Bennett | A variant of Overload with a fiery damage dealer. Thanks to the Raven Princess's abilities, the active hero will receive a 25% ATK bonus. |
 Clorinde  Raiden | Durin | Sucrose | BennettXilonen | An alternative composition with Electro Core, where Fischl's second slot is replaced by Durin. Both solutions offer roughly equal damage output and operate on a similar principle, differing only in the elements of the heroes in the first and second slots. |
Charged
The first group would be the most optimal choice, as the Hydro main-DD variation is significantly inferior to the similar Lunar Reaction and may have difficulty closing content.
| Character 1 | Character 2 | Character 3 | Character 4 | Description |
|---|---|---|---|---|
| Sucrose | Fischl | YelanXingqiuFurina |  Beidou  Kuki  Dori | The group's variant assumes a driver role. Here, the HE% requirement can be reduced to 140%, as she's constantly present on the field and catches most of the enemy's energy particles. If you combine Xingqiu and Beidou, who can provide supportive abilities, you can forgo the healer. |
Ayato TartagliaNeuvillette | Fischl | Sucrose | BennettXilonen Zhongli | The fourth slot support can be anything, but if you choose a Judge, avoid Bennett, who is useless. It's not recommended to replace Fischl, as this will reduce his magical resonance and ease of use. |
Electro
Although Anemo does not interact with Dendro, it is possible to use a support of this element to strengthen the main damage dealer.
| Character 1 | Character 2 | Character 3 | Character 4 | Recommendation |
|---|---|---|---|---|
| ClorindeRaiden | Fischl Yae Miko | Sucrose |  Baizhu  Yaoyao | A companion in the fourth slot is needed to periodically activate Stimulate, which boosts the primary and secondary lightning damage dealer. It's important to timely deploy the boost, ensuring the enemy isn't afflicted with the Dendro status. |
| Raiden | Fischl | Sucrose | BennettZhongliXilonen | The concept of this group is closer to mono-Electro. It's important to paint your ultimate purple, which can be difficult given the Bennett field. Equip a set on Zhongli. Archaic PetraThere's no need to replace Fischl, as Secret Rite has too significant an impact on overall damage. |
Lunar reactions
It's rare to be able to include the Secret Rite in groups with Lunar Charge and Budding, but it's not always necessary there, and the girl can be added just to increase the MS parameter.
| Character 1 | Character 2 | Character 3 | Character 4 | Recommendation |
|---|---|---|---|---|
 Kyryll |  AinoFurina |  Ineffa  IansanFischl | Sucrose | Without Fischl, the Secret Rite bonuses won't work, but they won't make much of a difference anyway. Focus on finding the optimal hero combination and only take the princess if there are no other options. |
 Nefer |  Lauma | Mona | Sucrose | Laume highly recommends C1, but if it's unavailable, Sucrose, Mona, or even both can be equipped with Prototype Amber. Astrologer can be difficult to maintain a rotation, but without the increased charged damage from Arcane Rite, such a composition becomes less meaningful. |
Star reactions
With the Elemental Mastery buff and synergy with Anemo, she'll be a great option for Star scattering and can be useful in a strengthened Explorer.
| Character 1 | Character 2 | Character 3 | Character 4 | Description |
|---|---|---|---|---|
 Spring  Mizuki |  Odette |  Cryo Traveler  Water lily |  Sucrose | A team with Star Dispersion, where Sucrose is effective due to the closed Anemo Resonance, the MS buff, and the Cryo resistance reduction. If you're playing with Vesna and Cryo GG, without Vodyana, equip Prototype: Amber on the Alchemist's Apprentice to heal allies. |
 SandroneCryo Traveler | OdetteYae Miko | Sucrose |  Alyosha  Qiqi  Escoffier | The fourth slot can be occupied by either an Electro or Cryo character, depending on the second-place choice (the party must have at least one Electro/God's Eye character), and their abilities will activate Sandrone and Cryo GGs thanks to Star Wedge. However, it must be a healer, as other companions cannot heal. |
 CynoWriothesley | Odette | Sucrose | AlyoshaYae Miko | Unlike the previous group, Odette's presence is critical here to activate abilities. The Witch's Prophecies Risley or Saino. Therefore, the list of companions for fourth place narrows down to Alyosha, or, if you can play without a healer or put Prototype: Amber on Sucrose, Yae Miko. |
Extra Stats For Leveling
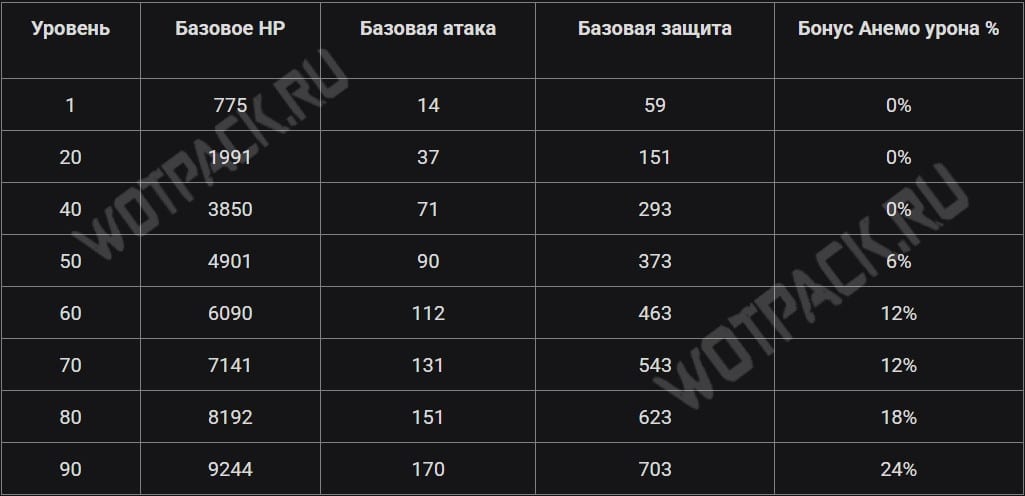
The main stat that increases with leveling is the Anemo bonus. In addition, other stats such as health, attack, and defense also increase. Wandering luck It's not worth it for the heroine, since she's a support who doesn't rely on "innate" stats and won't even get a boost to her support skills.
Leveling
All the necessary resources can be easily found while exploring Mondstadt.
Ascension
To level up a character to level 90, you will need the following materials:
| Resource | Where to find it |
 Slivers, fragments, chunks and gemstones of Vayuda Turquoise. |
Weekly and world bosses. |
 Jumper's nectar ×18 Shimmering Nectar ×30 Elemental Nectar ×36 |
Rewarded for defeating Whopperflowers. |
 Hurricane Seed ×46 |
Material from Anemo Hypostasis. |
 Windwheel Aster × 168 |
A curiosity from Mondstadt. |
 Hero's Wit × 421 |
Quests, exploration of the world, arteries of the earth, Teapot of Serenity. |
 Mora ×1 |
Arteries of the earth. |
Talents
To upgrade one ability to level 10, you need the following materials:
| Resource | Where to find it |
 Teachings of Freedom ×3 Guides to Freedom ×21 Philosophies of Freedom ×38 |
Talent books that can be obtained in the dungeon Forsaken Rift в Monday, Thursday и Sunday. |
| Jumper's nectar ×6 Shimmering Nectar ×21 Elemental Nectar ×31 |
A resource that can be knocked out of Whopperflowers. |
 Boreas' Spirit Box ×6 |
Rare material from the weekly boss Andrius. |
 Crown of Insight × 1 |
Awarded for completing major version events and the offering system in different regions. |
| Mora ×1 |
Almost all game actions and arteries of the earth. |
Skills

Sucrose is a support character whose abilities focus on triggering the Disperse reaction and increasing the elemental mastery of her teammates. In combat, she rarely uses standard attacks, preferring her E skill and ultimate, which can absorb other elements.
Basic (Active) Skills
She doesn't have any real damage of her own; all her skills are aimed at helping her allies.
Basic Essence of Wind
Normal attack: hits with the Anemo element four times in front of her.
Charged Attack: spends some stamina and attacks with Anemo in an area.
Plunging Attack: transforms into a clot of Anemo element and descends to the ground, dealing area damage upon landing.
Experiment #6308
- Cooldown: 15 seconds
Summons a small spirit that pulls enemies and objects into a specific area, tosses them into the air, and attacks with Anemo. Larger enemies cannot be tossed with this skill.
Forbidden! Isomer 75 / Type II
- Duration: 6 seconds
- Cooldown: 20 seconds
- Energy consumption: 80.
Creates a large spirit that pulls enemies in and tosses them into the air for a short period of time. The spirit can also absorb elements.
Element Absorption: When in contact with Pyro, Hydro, Cryo, and Electro, the spirit, along with Anemo, attacks with the absorbed element. Only one element can be absorbed per skill activation. After absorption, the spirit takes on the color of that element.
Passive Skills
Additional skills unlock at level 30, 50, and 70, providing benefits in crafting and combat, with the final effect unlocked after completing a quest. The Law of Boundaries.
When crafting character and weapon upgrade materials, has a 10% chance to create an additional item.
By causing the Swirl reaction, Sucrose will increase the Elemental Mastery of allies with the corresponding element by 50 points for 8 seconds.
When hitting an enemy with her elemental skill or elemental burst, Sucrose will increase the elemental mastery of all party members except herself by 20% of her own elemental mastery for 8 seconds.
After completing Witch Lessons: Flowers from Fairytale LandSucrose will become a Witch character. If there are at least two such characters in the party, the effect of Witchcraft: A Secret Rite is activated, which enhances Witch characters:
- For 15 seconds after creating a small Air Spirit, the damage of normal, charged, and plunge attacks, elemental skills, and elemental explosions of nearby party members is increased by 5,71428%.
- For 20 seconds after creating a large Air Spirit, the damage of normal, charged, and plunge attacks, elemental skills, and elemental bursts of nearby Witch characters is increased by 7,14285%.
Talent Leveling Order
Ultimate (Q) > Elemental Skill (E) > Normal Attacks (all optional)
Since all of the girl's bonuses come from passive talents and aren't defined by active skills, there's no point in spending resources on increasing them. If you still feel the urge, start with Elemental Explosion, then level up E, and only improve your punches for the driver role.
Constellations
| Name | Effects |
| 1. Cluster vacuum field | Increases the number of charges of the Astable Anemohypostasis Creation - 6308 skill by 1. |
| 2. Bet: Free Form | Increases the duration of the Forbidden Creation - Isomer 75 / Type II skill for 2 sec. |
| 3. The Flawless Alchemist | Increases the skill level of Astable Anemohypostasis Creation - 6308 by 3. Max. level: 15 |
| 4. The Mania of Alchemy | Every 7 normal and charged attacks of Sucrose reduce the cooldown time of the Astable Anemohypostasis Creation - 6308 skill by 1-7 sec. |
| 5. Attention: ordinary flask | Increases the level of the Forbidden Creation - Isomer 75 / Type II skill by 3. Max. level: 15 |
| 6. Entropy of chaos | If the skill Forbidden! Isomer 75 / Type II activates elemental absorption, all squad members receive a 20% damage bonus of the corresponding element for the duration of the skill, and Witch characters nearby squads receive an additional damage bonus of 8,57142% of the corresponding element. |
The best constellations of Sucrose are С1, С2 и С6.
- The first constellation is the most important and allows you to use your elemental skill twice. This provides more energy regeneration for more frequent Ultimate activations, and with the Codex of Favonia, it turns the heroine into an excellent powerhouse for Anemo damage dealers.
- The second constellation Gives additional seconds for the ult, during which the ability will deal more damage, increase the duration of the ties and allow the main damage dealer to attack the absorbed element longer.
- The sixth constellation This will be a nice buff for "classic" teams against elemental damage. The bonus is especially noticeable in groups where at least two characters share the same element.
How to play Sucrose

Sucrose's abilities are used to maintain her allies' increased Elemental Mastery. This can be done in two ways:
- By triggering the Scatter reaction.
- By hitting enemies with E-shot and ult.
Dispersion spreads a specific element to all nearby enemies, making it easier to trigger reactions. Before using abilities, use your primary damage dealer's skills or a sub-damage dealer's skills to apply an elemental status effect to enemies. Afterward, use skills to inflate enemy effects to gain buffs.
Rotation
Skill Order: Elemental status from the main damage dealer or sub-DD > E (elemental skill) > E (elemental skill) > Q (ultimate)
A more detailed description of the rotation:
- Use the abilities of your primary or secondary damage dealer to inflict on your enemies the elemental status that you want to further Swirl or absorb with your ult.
- Switch to Sucrose and use her skill once or twice depending on if she has constellations or Sacrificial Fragments.
- If your ultimate needs to absorb the same element, use Q. Otherwise, first switch to a sub-DD, apply the new status to enemies, return to Sucrose, and activate your ultimate to absorb the element and apply the buff.
- Switch to your primary damage dealer and target weakened enemies.
- Repeat starting from step one as your abilities cool down.
Character Summary

Sucrose is an epic Anemo character who plays a support role in Genshin Impact. She's one of the few companions who can boost her allies' Elemental Mastery, a crucial skill in groups through reactions, particularly Steam and Melt. While her primary strength lies in buffing multi-element groups, she's still quite effective in single-element teams, providing her with a tie, energy, and damage affix.
Farming artifacts and finding a catalyst isn't difficult, as she only requires MS and HE%, and her simple playstyle makes her suitable even for beginners. During patches 6.0-6.8, which focused on Lunar Reactions, which are heavily tied to MS, she returned to the top of the tier list and became an indispensable part of meta groups.






I was curious (I'll be testing it anyway) if Kazuha and Singa would be better than Sucrose (C3) when playing in Clorinda's Fischl Xingqiu squad. Xingqiu could be replaced, but I don't know what to use. Sucrose herself is level 60, and with the Witchcraft unlocked, will the synergy with Fischl increase the team's damage output (Kazakh's MS is 1000, Sucrose's MS is 900, without buffs)?
You have a mistake in the word First Const.
Hello! Thank you, it has been fixed.
If I put the squad: Flins, Columbine, Fischl and Sukharosa, will it be ok?
Yes, but you need to play carefully. Kirill is tough without a shield, he gets knocked down a lot. And then you can use a prototype amber on Columbine to provide some healing.
you have in melting the team of Ayaki
Does Sucrose have a cap on Elemental Mastery? It's just that Nahida has a clearly stated maximum, while Sakharok doesn't mention a limit.
It's all written there, in the talents "Clever Breeze" - gives 20% MS to squad members for 8 seconds (except for yourself) from MS. So, you collect 1000 MS, distribute 200
We're specifically talking about a limitation here: Is there a maximum that will prevent it from sharing more ms? Let's say 200 ms. And there's no such limitation.