

In Genshin impact, the nameless Wanderer (Scaramouche) takes the position of the main damage dealer, who hits enemies with basic attacks and with the help of a powerful ult. Of particular interest is his skill, which allows him to fly above enemies and move quickly in the air. If desired, he can be played as a driver with strong secondary damage dealers who hit from the pocket.
Being a representative of the Anemo element, he feels most comfortable in a team with heroes of other elements, since in this case he not only Swirls them, but also receives special buffs. In addition, the hero is quite versatile in his builds and can be built as a classic damage dealer, as well as into Swirl through elemental mastery.
| Rating | B-position in tier lists |
| Rarity | ⭐⭐⭐⭐⭐ |
| Appeared in-game | December 7, 2022 (patch 3.3) |
| How to Get the Character | From Ashes Reborn |
| Element | Anemo🌪️ |
| Weapon | Catalyst |
| Gender | Male |
| Affiliation |
|
| Constellation | Peregrinus |
| Home region | Inazuma |
| Birthday | 3 January |
| Zodiac sign | Capricorn |
| Age | More than 450 years old |
| Height | 160-165 cm |
| Special dish | Shimi Chazuke |
| Voice Actors |
|
How to Get the Character

It was possible to pull for the Wanderer in the second half of the 4.6 update, May 14 to June 5. You would need Primogems, and to unlock the constellations, you need to get copies of the character.
For the schedule of new characters and the rerun of the Wanderer, follow our banner schedule.
Strengths and Weaknesses

The hero has a unique elemental skill that has no analogues in the game. This distinguishes him not only among the heroes of his element, but also among other characters. However, to decide for sure whether it is worth building the Wanderer, you should familiarize yourself with his pros and cons.
| Strengths | Weaknesses |
| Wields a catalyst that grants constant Anemo infusion, allowing for effective reaction play. | Hovering can make it difficult to control the character. |
| Passive talent Jade-Claimed Flower gives bonuses to characteristics and elemental skill from interaction with Hydro, Pyro, Cryo and Electro: (no more than 2 at a time up to C4). Thus, synergy with other elements further enhances it while hovering. | When flying, you need to constantly monitor the level of stamina, which is consumed quite quickly. Partly solved by interaction with Hydro or with the help of C6. |
| The passive talent Gales of Reverie introduces a new mechanic that allows you to not consume stamina while flying, while still dealing additional damage with a volley of wind arrows. | While hovering, vulnerable to certain types of attacks. |
| Ascension increases the chance of a critical hit, which makes it easier to pick up artifacts and weapons when balancing stats. | Up to C4, only 2 simultaneous buffs from the Jade-Claimed Flower passive talent are available. |
| The elemental skill gives the hero the ability to hover above the ground and allows him to move around the world more comfortably. Scaramouche's stamina depends on the presence or absence of a Hydro character in the team (+20 stamina) and the movement style (flying up, dodging and shifting consume more than just hovering). | Low base health requires a Healer or Shielder to be on the team. |
| High base ATK (327 at level 90) makes him a powerful main DD and driver who, while on the field, hits under reactions with the help of pocket skills of supports. |
Stat Bonus for Ascension
The main characteristic of the former Balladeer is critical hit chance. This is the stat that increases with the character's ascension. In addition to critical chance, HP, ATK and defense increase. The exact values are presented in the table.
| Level | Base HP | Basic attack | Base DEF | Critical Hit Chance |
|---|---|---|---|---|
| 1 | 791 | 26 | 47 | 5.0 % |
| 20 | 2053 | 66 | 123 | 5.0 % |
| 40 | 4086 | 132 | 244 | 5.0 % |
| 50 | 5256 | 169 | 314 | 9.8 % |
| 60 | 6593 | 213 | 394 | 14.6 % |
| 70 | 7777 | 251 | 465 | 14.6 % |
| 80 | 8968 | 289 | 536 | 19.4 % |
| 90 | 10164 | 328 | 607 | 24.2 % |
Taking into account the basic increase at level 90, the character has 24.2% of his own Crit rate.
Skills

The hero is a wielder of the catalyst and has the Anemo of the eye of God, which allows him to effectively interact with other elements when triggering the Swirl reaction. He also has a unique mechanic of the elemental skill, thanks to which he can hover in the air and inflict increased damage from normal and charged attacks. The ultimate pulls enemies and inflicts Anemo in the area.
Basic (Active) Skills
Yuuban Meigen
Source of damage: ATK.
When performing normal attacks, inflicts up to three blows with a wind blade imbued with the Anemo element.
When charged, consumes a certain amount of stamina and hits Anemo in an area.
During the plunging attack, accumulates wind energy and falls to the ground, hitting all enemies along the way. Upon landing, deals Anemo damage to the area.
Hanega: Song of the Wind
Cooldown: 6 seconds.
Source of damage: ATK.
Deals Anemo damage to an area and flies up, entering the state Windfavored:
- Plunging strikes are not available.
- Normal and charged attacks are converted into Kuugo: Fushoudan и Kuugo: Toufukai. Their damage and area of effect are increased. The damage is considered a normal and charged attack respectively.
- Kuugo: Toufukai does not consume stamina.
In this state, he hovers and his movement gains the following properties:
- Uses Kuugoryokufor hovering - 100 stamina.
- Acceleration in the air (sprint): Pressing the sprint button consumes Kuugoryoku, then sprints while hovering. Holding it down continuously consumes Kuugoryoku, allowing you to move quickly through the air. This effect replaces normal sprinting.
- Increasing hovering altitude: Kuugoryoku is also consumed when you press jump, increasing your flight height. If you hold the button down, Kuugoryoku will be consumed continuously, increasing your height even more.

When the character runs out of Kuugoryoku, the state is interrupted. Reactivating while Windfavored is active also ends this condition.
Kyougen: Five Ceremonial Plays
Cooldown: 15 seconds.
Enegry consumption: 60.
Source of damage: ATK.
Compresses the atmosphere at one point and deals multiple Anemo damage to the area. If you activate the ult while Windfavored (elemental skill) is active, this state will end.
Passive Skills
Strum the Swirling Winds
Upgrading ranged weapons and catalysts costs 50% less mora.
Jade-Claimed Flower
If the hero comes into contact with Hydro, Pyro, Cryo or Electro during an Elemental Skill, the Windfavored state gains the following bonuses depending on the element:
- Hydro: Kuugoryoku increases by 20. Total: 120.
- Pyro: ATK increases by 30%.
- Cryo: crit chance is increased by 20%.
- Electro: normal and charged attack hits restore 0,8 energy no more than 1 time every 0,2 seconds.
Only 2 of these buffs can exist at a time.
Gales of Reverie
Hitting with normal (Kuugo: Fushoudan) or charged attacks (Kuugo: Tofukai) during elemental skill has a 16% chance of granting it the effect of Descent:
- Acceleration in the air while in the Windfavored state will interrupt this effect: now sprinting does not consume Kuugoryoku and the hero performs an attack of 4 wind arrows, each of which deals Anemo damage equal to 35% of ATK.
- If normal or charged hits do not trigger this effect, the chance of it being triggered by the next hit increases by 12%. The chance to trigger occurs no more than once every 1 sec.
Talent Leveling Order
Scaramouche is an Anemo main DPS that deals primary damage with normal and charged strikes during his elemental skill. In this case, they are scaled with the first talent, so their level also affects the skill's damage. Thus, it is recommended to prioritize improving abilities as follows:
- NA - Normal attacks.
- E - Elemental Skill.
- Q - elemental burst.
Constellations
| number | Name | Effects |
|---|---|---|
| 1 | Shoban: Ostentatious Plumage | Passive talent required to unlock - Gales of Reverie. While in the Windfavored state of the elemental skill, the speed of normal and charged attacks (Kuugo: Fushoudan and Kuugo: Tofukai) is increased by 10%. In addition, Gales of Reverie passive talent arrows deal an additional 25% damage of attack power. |
| 2 | Niban: Isle Amidst White Waves | When the Wanderer is in the Windfavored state of his elemental skill, the damage of the elemental burst when activated will increase by 4% for each point of difference between the current and the maximum Kuugoryoku. The maximum is 200%. |
| 3 | Sanban: Moonflower Kusemai | Increases skill level of Kyougen: Five Ceremonial Plays (elemental burst) by 3. Max. Lvl: 15 |
| 4 | Yonban: Set Adrift into Spring | Passive talent required to unlock - Jade-Claimed Flower. If the Jade-Claimed Flower passive talent is activated while using an elemental skill, in addition to the bonuses of the corresponding elements, the character will receive 1 random buff that has not yet been activated. There can be no more than 3 at the same time. |
| 5 | Matsuban: Ancient Illuminator From Abroad | Increases the skill level of Hanega: Song of the Wind (elemental skill) by 3. Max. Lvl: 15 |
| 6 | Shugen: The Curtains' Melancholic Sway | If the Wanderer in Windfavored state hits an enemy with a normal attack (Kuugo: Fushoudan), he creates the following effects:
|
Best constellations of the Wanderer are С1, С2 and С4:
- The first constellation will increase the speed of attacks (normal and charged) while hovering by 10%, and will also increase the damage from the passive talent Gales of Reverie - a volley of wind arrows will deal 60% damage from ATK instead of the original 35%. Overall, a good const that increases the damage of the elemental skill.
- The second constellation Increases the damage of the ultimate to 200% if activated during the Windfavored state (floating).
- The fourth one strengthens the passive talent Jade-Claimed Flower and allows you to receive bonuses from 3 elements instead of 2 during an elemental skill. This expands the synergy with other elements and at the same time buffs the hero himself.
How to play the Wanderer

The basis of Scaramouche game is hitting with normal and charged attacks during an elemental skill (hover), then deliver a finishing blow with his ultimate. He can also use passive abilities of supports to deal his own damage through buffs or trigger a reaction of Swirl. Playing with other elements will also give him bonuses from the passive talent.
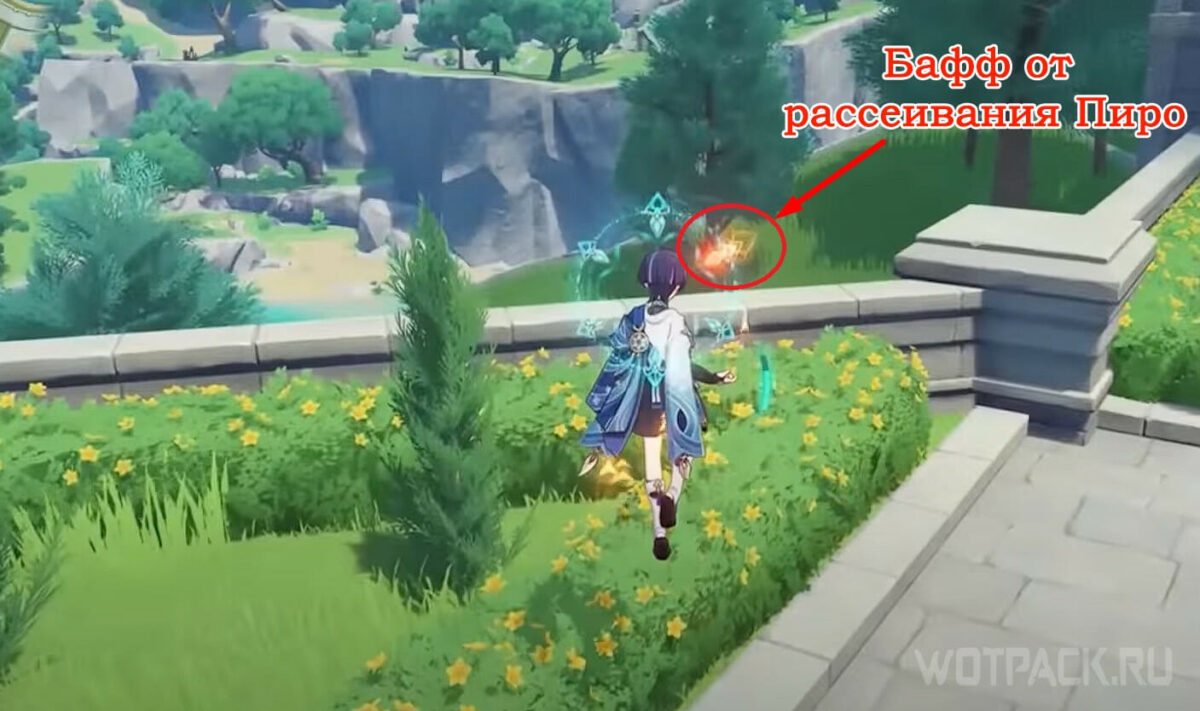
The difficulty arises in dealing maximum final damage and simultaneously controlling the stamina points of the Kuugoryoku, which are spent during the flight during dashes and gaining altitude. To do this, you will need to maintain rotation or use additional energy sources for the skill (Hydro Swirl or C6).
Rotation
In any build, the main goal is to strengthen the hero as much as possible, and then switch to him and hit with normal blows. An example of the order of using the characters' abilities:
- Supports activate skills and ultimates for buffs and status outside of combat.
- Scaramouche comes out and uses an elemental skill, rising into the air. After which he fires normal and charged shots at all enemies.
- Once the stamina runs out and the hero hits the ground, he will activate his ultimate, ending the rotation.
- Repeat from step 1.
While hovering, try to dash only if the Gales of Reverie talent is activated (a bell sound is heard), as this will allow you to not waste stamina and release a hail of arrows. In other cases, it is not recommended to accelerate or gain altitude unless necessary, as these actions consume Kuugoryoku points. This will leave fewer hits to deal damage.
Leveling
This table shows the total amount of leveling materials required to reach the maximum level.
Ascension
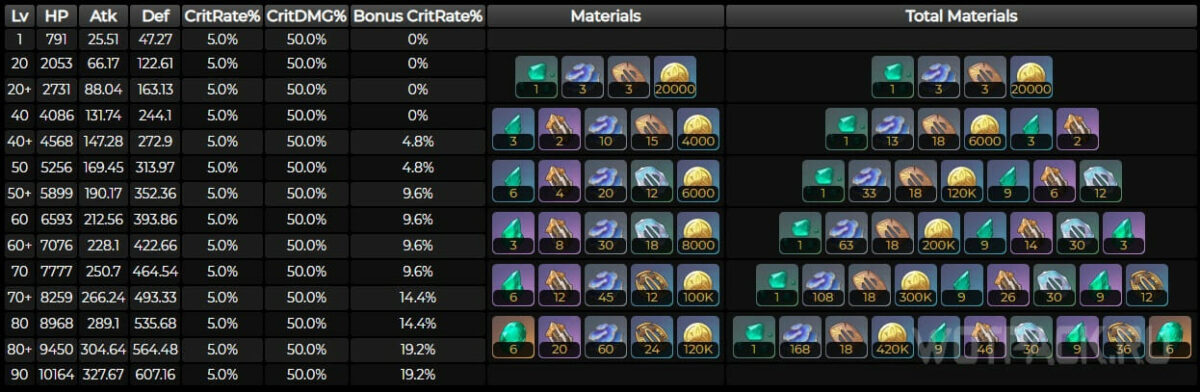
Source: honeyhunterworld.com
To level up to level 90 you need:
- Slivers, fragments, chunks and gemstones of Vayuda Turquoise. If there is a shortage, minerals can be crafted from other stones using Dust of Azoth.
- Perpetual Caliber - material dropped by the world boss Aeonblight Drake.
- Handguardsdropped by Nobushi и Kairagi in Inazuma.
- Rukkhashava Mushrooms — Sumeru specialty.
- 420.000 Mora and 421 Hero's Wit.
Talents
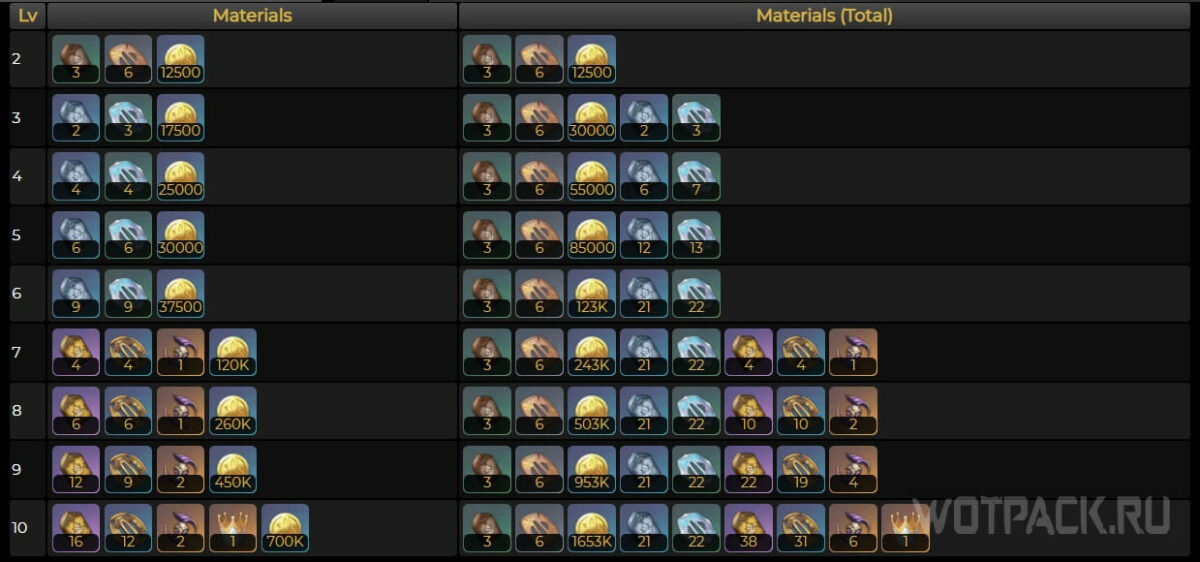
Source: honeyhunterworld.com
To upgrade talents, in addition to Handguards, you need:
- Teachings/guidess/Philosophies of Praxis - Dungeon Talent Books from Steeple of Ignorance, available on Wednesday, Saturday и Sunday.
- Daka's Bell - Weekly Boss Material, dropped by Shouki no Kami.
- Crown of Wisdom (Insight) for level 10 talents.
- 1.650.000 Mora.
The Best Wanderer Builds in Genshin Impact

The build for the Wanderer can be of 3 types: through Swirl, classic with crits and hybrid. Let's consider each in more detail.
Recommended Stats
Let's consider the features of selecting characteristics in artifacts for each of the current builds.
Swirl Build (driver)
For more damage from Swirlinh various elements, build into EM. In this case, it is important to have supports/sub-dds in the squad with abilities that work from off-field. The best option against groups of enemies.
In this case, the stats in the artifacts look like this:
| Artifact | Main characteristic | Additional stats |
|---|---|---|
 Flower of Life Flower of Life | HP (fixed) | Elemental Mastery Energy Recharge % CRIT DMG Crit chance / Attack Power % |
 Plume of Death Plume of Death | Attack Power (fixed) | Elemental Mastery Energy Recharge % Crit. damage / attack power % Crit Rate |
 Sands of Eon Sands of Eon | Elemental Mastery | Energy Recharge % CRIT DMG Crit Rate ATK % |
 Goblet of Eonothem Goblet of Eonothem | Elemental Mastery | Attack Power % / Elemental Mastery Energy Recharge % CRIT DMG Crit Rate |
 Circlet of Logos Circlet of Logos | Elemental Mastery | CRIT damage / CRIT Rate Energy Recharge % ATK % |
Recommended values:
- Elemental mastery: 450-500.
- Energy recharge: 120-130% and more.
- ATK: 1300 and more.
- Crit Rate and Crit Damage: ratio 1:2 (50 rate and 100 dmg).
Classic Build (Anemo DPS)
For a standard DPS build, you need crit, ATK and Anemo bonus, as it allows you to maximize your own damage from your elemental skill and ult. Works best against single targets.
Characteristics that are recommended to look for in artifacts for a standard build:
| Artifact | Main characteristic | Additional stats |
|---|---|---|
| Flower of Life | HP (fixed) | CRIT DMG Crit Rate Energy Recharge % ATK % |
| Plume of Death | Attack Power (fixed) | CRIT DMG Crit Rate Energy Recharge % ATK % |
| Sands of Eon | ATK % | CRIT DMG Crit Rate Energy Recharge % Elemental Mastery |
| Goblet of Eonothem | Bonus Anemo Damage % | CRIT DMG Crit Rate ATK % Energy Recovery % / Elemental Mastery |
| Circlet of Logos | Crit Chance / Crit Damage | CRIT damage / CRIT Rate Energy Recharge % ATK % Elemental Mastery |
Recommended values:
- ATK: 1700 and more.
- Crit Rate and Crit DMG: ratio 1:2 (60:120, for example) and more.
- Elemental mastery: 100-150.
- Energy recharge: 130-170% and more.
Hybrid build
Mixed build where EM, Crits and ATK are balanced. In this case, Scaramouche can play effectively both through reactions and from personal damage. But this build is the most difficult in terms of selecting stats.
The characteristics are as follows:
| Artifact | Main characteristic | Additional stats |
|---|---|---|
| Flower of Life | HP (fixed) | CRIT DMG Crit Rate Energy Recovery % / Elemental Mastery ATK % |
| Plume of Death | Attack Power (fixed) | CRIT DMG Crit Rate Energy Recharge % Attack Power % / Elemental Mastery |
| Sands of Eon | Attack Power % / Elemental Mastery | CRIT DMG Crit Rate Energy Recharge % Elemental Mastery / Attack Power % |
| Goblet of Eonothem | Anemo Damage Bonus % / Elemental Mastery | CRIT DMG Crit Rate ATK % Energy Recovery % / Elemental Mastery |
| Circlet of Logos | Crit Chance / Crit Damage Elemental Mastery | CRIT damage / Crit Rate / Elemental Mastery ATK % Energy Recharge % |
Recommended values:
- ATK: 1800-1900 and more.
- Crit Rate and Crit Damage: ratio 1:2 (60 rate and 120 dmg) and more.
- Elemental mastery: 350-400.
- Energy recharge: 130-170% and more.
The overall difference in DPS between the first two builds is not that high. In addition, much of the game is tied to randomness, so you can focus on either build, giving preference to a mixed build. Note that although the classic build emphasizes ATK rather than mastery, this does not mean that you need to play completely without reactions. The only difference is what is the main source of damage:
- for Swirl, this is the total DPS from all elements as a result of Swirling;
- for crits and ATK - increased damage from his own skills. At the same time, he can still play from Swirl, and even though the damage from reactions in this case is lower, this is compensated by the strength of the skills.
Thus, it is not so much the gameplay that differs, but the stats in the equipment.
Weapon Selection
Weapons are selected depending on the role they play in the squad. One way or another, it is important to consider that most of the character's damage comes from normal and charged strikes.
Equipment that is effective for other characters has been dismantled in weapon tier list.
Swirl Build (Anemo driver)
In this case, the hero acts as a squad driver, who, with the help of pocket skills of supports, deals increased damage from various elements. EM becomes a priority, the rest of the characteristics are obtained depending on the current stats - ATK and crits will not be superfluous anyway. The main thing is that there is enough EM.
| Name | Description | Recommendation |
|---|---|---|
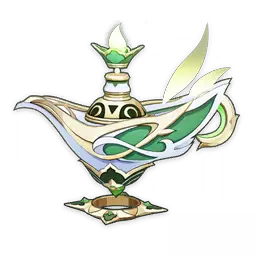 A Thousand Floating Dreams A Thousand Floating Dreams⭐️⭐️⭐️⭐️⭐️ Base ATK: 44-542 Elemental Mastery: 58-265 |
| Huge boost to Elemental Mastery, and if you have other elements on your team, it also gives you a bonus to Elemental Damage. One of the best weapons to play with Swirl. |
 Sunny Morning Sleep-In Sunny Morning Sleep-In⭐⭐⭐⭐⭐ Base ATK: 44-542 Elemental Mastery: 58-265 | After activating Swirl, increases Elemental Mastery for 6 sec. by 120-240 . After hitting with an elemental skill, increases EM by 96-192 for 9 sec. After hitting with an elemental burst, increases EM by 32-64 for 30 sec. | Although the hero's elemental skill is a stance, when activated, it deals a small one-time Anemo damage. This allows you to gain both stacks of the passive ability and acquire the maximum amount of EM. |
 Wandering Evenstar Wandering Evenstar⭐⭐⭐⭐ Base ATK: 42-510 Elemental Mastery: 36-165 | Every 10 seconds, increases the active character's ATK by 24%-48% of their EM for 12 sec. Nearby party members receive 30% of this bonus. The effect of multiple weapons stacks and triggers even if the equipped character is not on the battlefield. | 4⭐ alternative to A Thousand Floating Dreams. At the same time, the catalyst not only has elemental mastery in the main stat, but also increases ATK depending on EM. |
 Skyward Atlas Skyward Atlas⭐️⭐️⭐️⭐️⭐️ Base ATK: 48-674 ATK: 7,2-33,1% | Increases elemental damage bonus by 12%-24%. When you hit with a normal attack, there is a 50% chance to gain a blessing of the clouds, which attacks nearby enemies for 15 seconds and deals 160%-320% ATK. Can occur once every 30 seconds. | Although the catalyst does not grant elemental mastery, it increases elemental damage unconditionally and has high base and ATK in its main stat. Also a good option for the driver position. |
 Kagura's Verity Kagura's Verity⭐️⭐️⭐️⭐️⭐️ Base ATK: 46-608 Critical Damage: 14,4-66,2 | Using an elemental skill grants the character equipped with this weapon the Kagura Dance effect, which increases the damage of their elemental skill by 12%-24%. This effect lasts for 16 seconds. and can stack up to 3 times. At 3rd level of the effect, the character gains 12%-24% bonus damage to all elements. | Since the Swirl build is quite flexible, it allows you to switch to a mixed build if needed, where crits and the passive effect of the weapon will come in handy. In addition, Kagura gives an elemental damage bonus. |
 Lost Prayer to the Sacred Winds Lost Prayer to the Sacred Winds⭐️⭐️⭐️⭐️⭐️ Base ATK: 46-608 Crit Rate: 7,2-33,1% | Increases movement speed by 10%. During combat every 4 seconds gives 8%-16% Elemental damage bonus, effect stacks up to 4 times and ends when the character dies or leaves the battlefield. | A good catalyst for both Anemo driver and DPS. Although full stacks will have to be gained for a long time - 16 seconds, and all this time do not leave the battlefield. |
 The Widsith The Widsith⭐️⭐️⭐️⭐️ Base ATK: 42-510 Critical Damage: 12%-55,1% | When switching to the character, a random melody plays for 10 seconds. The effect works every 30 seconds:
| A situational catalyst, as its bonuses are random (in particular, the required elemental mastery). On the 5th awakening, it rises much higher in the rankings and takes approximately the top 3 position, if we take into account the average buffs. |
 Mappa Mare (F2P) Mappa Mare (F2P)⭐️⭐️⭐️⭐️ Base ATK: 44–565 Elemental Mastery: 24-110 | After triggering an elemental reaction, increases elemental damage bonus by 10 sec. 8%-16%. Stacks up to 2 times. | Free craftable weapon with a bonus to EM and a passive effect that is quite easy to activate in this build. At the last awakening it becomes top-5. |
 Magic Guide Magic Guide⭐️⭐️⭐️ Base ATK: 38-354 Elemental Mastery: 41-187 | Increases by 12%-24% damage against enemies affected by Hydro or Electro elements. | Gives a lot of mastery. A good option for playing through Swirl, but only works when playing with Hydro and Electro characters respectively. |
Classic Build (Anemo DPS)
The standard build requires a weapon with crits, bonuses to ATK, normal hits, and elemental damage. Compared to the Swirl build, this one focuses solely on your own skill damage.
| Name | Description | Recommendation |
|---|---|---|
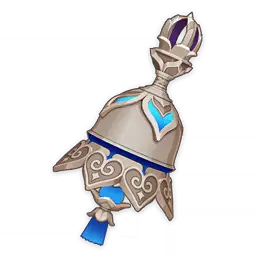 Tulaytullah's Remembrance Tulaytullah's Remembrance⭐️⭐️⭐️⭐️⭐️ Base ATK: 48-674 Critical Damage: 9,6%-44,1% | Increases normal attack speed by 10%-20%. After activating an elemental skill, the damage of normal attacks increases by 4,8%-9,6% per sec. for 14 sec. While this effect is active, each hit on an enemy instantly increases this type of damage by 9,6%-19,2% once every 0,3 sec. During the duration of one such effect, damage can be increased by a maximum of 48%-96%. The effect will be removed if the character leaves the battlefield, and reactivating the elemental skill will reset the damage increase. | The signature weapon of the Wanderer. Provides a lot of crits, a bonus to normal hits and has a high base ATK - everything the character needs for his own damage. |
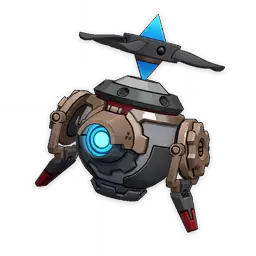 Cashflow Supervision Cashflow Supervision⭐️⭐️⭐️⭐️⭐️ Base ATK: 48-674 Critical Chance: 4,8-22,1% | Increases ATK by 16-32%. When the character's current HP increases or decreases, normal attack damage increases for 4 sec. by 16-32%, and charged by 14-28%. The effect stacks up to 3 times and occurs no more than once every 1 sec. When the equipped character gains 0,3 levels, attack speed increases by 3%. | The weapon instantly increases ATK and raises the critical chance. The distinctive feature of the catalyst is that it increases the damage of both charged and normal attacks, and also increases the attack speed parameter. As in the case of the Tome of the Eternal Flow, the passive skill is triggered every time after a heal or receiving a hit. |
 Tome of the Eternal Flow Tome of the Eternal Flow⭐️⭐️⭐️⭐️⭐️ Base ATK: 44-542 Critical Damage: 19.2%-88,2% | Increases HP by 16-32%. When the character's current HP increases or decreases, the damage of the charged strike increases by 14-30% for 4 sec. The effect stacks up to 3 times and occurs no more than once every 1 sec. When gaining 0,3 levels or updating 3 levels's duration, restores 8-12 energy. Energy can be restored in this way once every 1 sec. | Twice as powerful as the signature weapon in terms of crit dmg, but the passive is much harder to activate and only works for charged hits. Best used in a squad with Furina. |
| Kagura's Verity ⭐️⭐️⭐️⭐️⭐️ Base ATK: 46-608 Critical Damage: 14,4-66,2 | Using an Elemental Skill grants the character equipped with this weapon the "Kagura Dance" effect, which increases the damage of their Elemental Skill by 12%-24%. This effect lasts for 16 seconds. and can stack up to 3 times. At 3rd level of the effect, the character gains 12%-24% bonus damage to all elements. | Top 2 for personal damage. Gives 20% more crits than signature, but requires conditions to be met and does not buff basic attacks. |
 Memory of Dust Memory of Dust⭐️⭐️⭐️⭐️⭐️ Base ATK: 46-608 ATK: 10,8%-49,6% | Increases shield durability by 20 %-40 %. When hit, increases ATK by 4%-8% for 8 sec. The effect can stack up to 5 times and occur once every 0.3 sec. In addition, under shield protection, the ATK bonus of this effect is increased by 100%. | With a shield in the team, a pretty strong weapon. In this case, it also pays off because the hero is quite vulnerable in flight, so most often he will want to be under the shield. The weapon also gives a lot of ATK, with which all skills are scaled. The only downside is that it becomes more difficult to balance crits. |
| Skyward Atlas ⭐️⭐️⭐️⭐️⭐️ Base ATK: 48-674 ATK: 7,2-33,1% | Increases elemental damage bonus by 12%-24%. When hit ting with a basic attack, there is a 50% chance to receive a blessing of clouds, which attacks nearby enemies for 15 seconds and deals 160%-320% ATK. Can occur once every 30 seconds. | A stable option with an ATK bonus and an elemental damage bonus. If this weapon dropped from a standard banner, it can be easily mounted on a hero and deal high damage to enemies. But, as with Memory of Dust, there may be problems with crits. |
| Lost Prayer to the Sacred Winds ⭐️⭐️⭐️⭐️⭐️ Base ATK: 46-608 Crit Rate: 7,2-33,1% | Increases movement speed by 10%. During combat every 4 seconds gives 8%-16% elemental damage bonus, stacking up to 4 times and ending when the character dies or leaves the battlefield. | Crit Rate is less important due to the fact that this stat grows with ascension. However, when using a Crit DMG circlet, the Prayer will be a good solution and will allow you to better balance the stats. It is also worth considering that the weapon requires being on the battlefield to receive stacks. |
| The Widsith ⭐⭐⭐⭐ Base ATK: 42-510 Critical Damage: 12% ~ 55,1% | When switching to the character, a random melody plays for 10 seconds. The effect works every 30 seconds:
| Although the bonuses that drop are random, they are all useful in one way or another. However, if you play without reactions at all, it is better to give preference to other options so as not to lose damage when a note on elemental mastery drops. |
 Solar Pearl Solar Pearl⭐⭐⭐⭐ Base ATK: 42-510 Crit Rate: 6%-27,6% | Hitting with a normal attack increases the damage of elemental skills and elemental burst by 20%-40% for 6 sec. Conversely, elemental skill hits and elemental bursts increase normal attacks by 20%-40% for 6 sec. | Expensive weapon from the battle pass. If you buy BP and have this catalyst, but all the above options are missing, you can use it without losing DPS. Especially if you have awakenings. |
 Dodoco Tales Dodoco Tales⭐⭐⭐⭐ Base ATK: 41-454 ATK: 12%-55,1% | Normal attack hits make charged attacks on 16%-32% stronger for 6 seconds, and charged ones, in turn, increase ATK by 8%-16% for 6 seconds. | Event weapon from patch 1.6 (cannot be obtained now). If this catalyst is available, it is perfect for main-dd. Moreover, all awakenings were also given out for free during the event. |
 Ballad of the Boundless Blue Ballad of the Boundless Blue⭐️⭐️⭐️⭐️ Base ATK: 44-565 Energy recharge: 6.7%-30.6% | For 6 sec after a normal or charged attack hits an enemy, the damage of normal attacks will increase by 8-16%, and the damage of the charged ones is 6-12%. The effect can stack up to 3 times and occurs once every 0,3 sec. | A weakened alternative to the weapons above with a focus on energy recovery. Although the character does not have such an expensive burst of elements for the stat to be considered a priority, the catalyst can be equipped for the sake of passive effects. |
 Flowing Purity Flowing Purity⭐️⭐️⭐️⭐️ Base ATK: 44-565 ATK: 6%-27,6% | Activating an elemental skill increases the damage bonus of all elements by 8-16% for 15 sec. and imposes Bond of Life equal to 24% of max HP. The effect can occur once every 10 seconds. When Bond of Life is removed, bonus damage with all elements increases by 2-4% for every 1000 HP of Life Debt given. The damage bonus of all elements received in this way cannot exceed 12-24%. | A free catalyst that is recommended to be used only in ATK builds. The character starts the game on the field with E, so it will always activate the bonus before rotation. |
 Eye of Perception Eye of Perception⭐⭐⭐⭐ Base ATK: 41-454 ATK: 12%-55,1% | On hit with a normal or Charged Attack, there is a 50% chance to launch a Bolt of Perception that deals damage equal to 240% -360 % ATK damage. It can bounce back from enemy to enemy up to 4 times. Can occur once per 12-8 sec. | An ATK catalyst whose passive effect is easy to activate while hovering. It can also deal damage to multiple enemies at once.. |
 Blackcliff Agate Blackcliff Agate⭐⭐⭐⭐ Base ATK: 42-510 CRIT DMG: 12%-55,1% | When killing enemies, increases ATK by 12 %-24 % up to a maximum of 3 stacks. The effect lasts 30 seconds. | A specific variant that does not work against single targets and bosses. However, if you manage to get 3 stacks, the weapon becomes quite strong. |
Top Artifacts
Artifacts on the Wanderer are also chosen based on his main build:
- To play through Swirl, we look for EM and bonuses from reactions.
- For personal damage, elemental damage, ATK, bonus to normal attacks are needed.
| Name | Description | Recommendation |
|---|---|---|
 Desert Pavilion Chronicle Desert Pavilion Chronicle⭐️⭐️⭐️⭐️ ⭐️⭐️⭐️⭐️⭐️ | 2-Piece Bonus: Anemo damage bonus 15%. 4-Piece Bonus: After hitting with a charged strike, attack speed is increased by 10% and the damage of normal, charged and plunging attacks is increased by 40% for 15 seconds. | The best set for increasing your own damage (classic DPS build). Gives an Anemo bonus, increases speed and damage from hits, which fully corresponds to the character's gameplay. An example rotation for this set is to activate an elemental skill, use a charged skill, and then spam normal attacks. |
 Viridescent Venerer Viridescent Venerer⭐️⭐️⭐️⭐️ ⭐️⭐️⭐️⭐️⭐️ | 2-Piece Bonus: Anemo damage bonus 15%. 4-Piece Bonus: Swirl status damage is increased by 60%. For 10 sec. Reduces enemy elemental resistance by 40% when Swirl interacts with another element | The set is suitable for team play through interaction with other elements and the EM build. Although it does not provide bonuses for normal hits, like the previous one, for the game from reactions the set wins in efficiency. |
 Gilded Dreams Gilded Dreams⭐️⭐️⭐️⭐️ ⭐️⭐️⭐️⭐️⭐️ | 2-Piece Bonus: Elemental mastery bonus +80 points. 4-Piece Bonus: For 8 sec. after trigerring an elemental reaction, the equipping character receives the following buffs, depending on the elements of their team members:
| An alternative option when playing from Swirl, if there is a second Anemo character with the Viridescent Venerer set in the team. Can also be used for a hybrid build. |
 Shimenawa's Reminiscence Shimenawa's Reminiscence⭐️⭐️⭐️⭐️ ⭐️⭐️⭐️⭐️⭐️ | 2-Piece Bonus: Increases attack power by 18% 4-Piece Bonus: When using an elemental skill on a character with 15 or more energy, 15 energy is removed from them, but damage from normal, charged and plunging attacks is increased by 50% for 10 seconds. | A specific but working set for increasing your own damage. The nuance is that each use of an elemental skill removes energy points, which means you will have to ult much less often. |
 Viridescent Venerer / Desert Pavilion Chronicle / Wanderer's Troupe / Gilded Dreams / Gladiator’s Finale / Marechaussee Hunter | 2-Piece Bonus: +80 elemental mastery 2-Piece Bonus: +18% attack power 2-Piece Bonus: +15% Anemo Damage 2 parts: Increases normal and charged attack damage by 15%. | Combinations that can be combined with each other:
|
 Martial Artist Martial Artist⭐️⭐️⭐️ ⭐️⭐️⭐️⭐️ | 2-Piece Bonus: +18% attack power 4-Piece Bonus: Normal and charged attack damage is increased by 25% after elemental skill activation. | A good set for starting ranks. |
Teams
Since the hero has the Anemo Eye of God, the teams for the Wanderer can contain various elements. Therefore, it will not be difficult to set up a team for him for different playstyles.
Recommended characters
It is important to remember the bonuses that the Balladeer receives when reacting with certain elements:
- Hydro: The maximum Kuugoryoku is increased by 20.
- Pyro: ATK increases by 30%.
- Cryo: Crit Rate increases by 20%.
- Electro: Hits with normal and charged attacks restore 0,8 energy every 0,2 sec.
Buffs are important to consider and correlate with existing weapons and artifacts to get the maximum impact. Below we list the characters that are best suited for the squad.
Damage dealers
Characters who can attack from the pocket while Scaramouche fights on the field.
| Character | Element | Weapon | Effects |
|---|---|---|---|
 Ganyu Ganyu |  Cryo Cryo |  Bow Bow | Excellent secondary DD. The ult releases snowflakes in the area. |
 Rosaria Rosaria | Cryo |  Polearm Polearm | Secondary DPS, including area of effect. In addition to the bonus from the character's passive talent, also increases critical chance to 15%. |
 Mona Mona |  Hydro Hydro |  Catalyst Catalyst | Applies Hydro status and increases all damage dealt to enemies by elemental burst. |
 Xingqiu Xingqiu | Hydro |  Sword Sword | Hydro status and pocket support with elemental burst swords. Elemental skill increases interrupt resistance. |
 Candace Candace | Hydro | Polearm | Basically boosts normal attacks by 20%. Passive talent during the ultimate grants an additional 0,5% increase for every 1000 Max HP of Candace. |
 Xiangling Xiangling |  Pyro Pyro | Polearm | A great secondary fire damage dealer. Her Fire whirlwind does not rise into the air, but follows the hero, so the Wanderer can Swirl Pyro. |
 Yae Miko Yae Miko |  Electro Electro |  Catalyst Catalyst | Elemental skill totems are on the field for 14 seconds, which is enough for an effective Swirl. |
 Fischl Fischl | Electro | Bow | Electro support and support DD with pocket skills that deal damage even if Fischl is inactive. |
 Beidou Beidou | Electro |  Claymore Claymore | Since Elemental Burst Lightning is activated by normal hits, Beidou is a good partner for Electro Swirl play. |
Supports
Buffers, healers and shielders for squads.
| Character | Element | Weapon | Effects |
|---|---|---|---|
 Faruzan Faruzan |  Anemo Anemo | Bow | Her elemental burst will reduce the Anemo resistance of enemies and give a bonus to Anemo damage. Also, the passive talent when hitting with abilities increases the damage dealt by 45,9% of Faruzan's base ATK. |
 Jean Jean | Anemo |  Sword Sword | Heals and helps replenish energy faster. |
 Sucrose Sucrose | Anemo | Catalyst | Also acts as a battery and increases elemental mastery. |
 Prune Prune | Anemo | Catalyst | An Anemo support damage dealer. Requires Arcane Rite, so only works with another Witchcraft character in the party. |
 Kazuha Kazuha | Anemo | Sword | Excellent secondary DD, pulls and gives a bonus to elemental damage. |
 Qiqi Qiqi | Cryo |  Sword Sword | Provides healing from all abilities. Also, her ult is convenient because it is enough to hit enemies with a mark to start healing. |
 Diona Diona | Cryo |  Bow Bow | Shield, area cryo, healing. At C6, increases elemental mastery in the ult circle. |
 Layla Layla | Cryo | Sword | Strong shield, Cryo status in the area, buff of all basic attacks at C4. |
 Kokomi Kokomi | Hydro | Catalyst | Healing and Hydro status from an elemental skill that is active even if Kokomi is not on the battlefield. |
 Thoma Thoma | Pyro | Polearm | Periodic Pyro from ult, shield and bonus to normal and charged attacks on C6. |
 Bennett Bennett | Pyro | Sword | Buff, healing and Pyro for Swirl. |
 Dori Dori | Electro | Claymore | Heal and restore energy from the ult. |
 Yun Jin Yun Jin |  Geo Geo | Polearm | Buffs basic attacks with her elemental burst. |
 Zhongli Zhongli | Geo | Polearm | Provides strong shields and lowers the elemental resistance of enemies. |
Examples of current commands
The squads are quite diverse, as the hero can play both from his own elemental attacks and from reactions. As a second Anemo, the best ally is Faruzan, as she reduces resistance to this element by 30% and gives a bonus. Scaramouche also needs a support, which will increase his resistance to interruption and give him more survivability, since he remains vulnerable during the stand. Let's highlight the following examples of teams:
| Character 1 | Character 2 | Character 3 | Character 4 | Features |
|---|---|---|---|---|
 Wanderer Wanderer | Prune Faruzan Faruzan |  Durin Durin |  Nicole Nicole | Top 1 squad. Durin in Light Stance reduces resistance to Anemo and Pyro, Nicole provides interrupt resistance with a shield and attack buff. Prune and Faruzan are practically equal—their results differ by only 2-4% of team damage, so take the one with the higher const. |
| Wanderer | Xingqiu Yelan Yelan | Xiangling | Bennett | Pyro and Hydro Swirl (national team):
|
| Wanderer | Faruzan | Mona |  Diona Diona QiqiLayla QiqiLayla | Hydro and Cryo Swirl:
|
| Wanderer | Faruzan | XingqiuYelan | Bennett | Hydro and Pyro Swirl:
|
| Wanderer | Faruzan |  Raiden Raiden | Kokomi | Electro and Hydro Swirl:
|
| Wanderer | Xingqiu | Beidou Fischl Fischl | Dori | More "cheap" alternative group with Electro and Hydro. The principle of operation is similar, only in this case there is no second Anemo (which means that it is advisable for the Wanderer wear the Viridescent Venerer) and there is no bonus to recovery from Raiden's ult. Instead, Dori helps replenish it, as she also gives an increase in ER. Also, the problem with the lack of energy is solved by frequently Swirling Electro and Favonius weapons. |
| Wanderer | Thoma | Yae MikoRaiden | Bennett | Pyro and Electro Swirl:
|
| Wanderer | Xiangling | Thoma | BennettDori | If you replace Electro with Pyro in the previous build, there will be more bias towards Pyro Swirl, which is more effective against a group of Cryo opponents. You can leave Bennett for the "roast" squad or use Dori if in the first case there are problems with the restoration of energy. |
| Wanderer | RaidenBeidouFischl |  Sara Sara | Zhongli Noelle Noelle | Squad with an emphasis on Swirling Electro:
|
| Wanderer | Rosaria | Layla | Kokomi | Rosaria and Layla deal Cryo to the area. Layla also applies shields, protecting the Wanderer. Kokomi heals and applies the Wet status for Frozen. |
| Wanderer | Kazuha | Xiangling GanyuMona GanyuMona | LaylaBennett | The squad with Kazuha, where he acts as a secondary DD, pulls and Swirls the elements. After which the Wanderer hits the crowd of opponents with normal and charged attacks. |
| Wanderer | Candace | Xiangling | Jean | Pyro and Hydro Swirl (Candace C6):
|
| Wanderer | Mona | Ganyu | LaylaDiona | Alternative Frozen team:
|
| Wanderer | Faruzan | Zhongli | Yun Jin | Setup option without reactions:
|
| Wanderer |  Lisa Lisa | Xiangling |  Kaeya Kaeya Barbara Barbara | F2P team with Electro, Pyro, Cryo or Hydro Swirl. Although the Wanderer only gets 4 elemental interaction bonuses at a time before C2, it's still a strong free team. Especially if the hero wears the Viridescent Venerer. |
| Wanderer |  Odette Odette Cryo Traveler Cryo Traveler |  Water lily Water lily |  SucroseFaruzan SucroseFaruzan | The Star Scatter commands aren't as strong due to Scaramucci's lack of scale for this reaction in his abilities, but it's still a viable option if you want to bypass boss mechanics. |
Is The Character Worth Pulling?

Wanderer (Scaramuccia) is an Anemo damage dealer in Genshin Impact, who is both simple and challenging to master, primarily due to his hover mechanic. Despite his relatively short rotation, he requires managing his special stamina bar while also carefully determining which attacks or moves to spend it on to maximize DPS. His passive talent, "Jade Flower," also provides buffs depending on the element it interacts with—all of this is important to consider when building your team and during combat.
For example, if you Swirl Hydro, Kuugoryoku level increases by 20. Therefore, it will be possible to inflict more blows. And when Cryo is Swirled, crit rate increases by 20% - this means that when playing with this element, you can focus on crit dmg. In general, the character is quite interesting in terms of builds and mechanics, as he has his own unique gameplay and a fairly high potential for inflicting damage.








Hello, can you tell me if a wanderer can be played with a water spirit? I'm planning on making a team with a wanderer, Faruzan, a water spirit, and someone else. Unfortunately, I have no idea who else to put in. I thought Lan Yan would be suitable, but I've thought about it. A healer plus a shielder seems odd. Can you recommend anything?
Wanderer c0, Xiangling c6, Qiqi c1. Currently, Raiden is paired with them, but it seems weak. Who can be put in her place?
Please add units through star scattering
The Wanderer is a hypercarry, not a reactor: The Wanderer's base damage is built on his own massive attack percentages, anemo damage buffs, and crits. His entire build is geared toward pure damage, plus stat conflict (MS or attack/crit): the damage of the Star Vortex scales with the elemental mastery of the characters on the team. This means a Wanderer with a focus on his own damage (crit, crit chance, and attack) will have to completely rebuild his artifacts for MC and change his signature weapons, which will completely ruin his own damage. And specialized characters do this better: characters originally designed for Star Dispersion (for example, Mizuki) deal millions of damage in this reaction, since their talents directly convert MC into massive direct damage. The Wanderer simply doesn't have such passives. Trying to rework a Wanderer for Star Dispersion is to artificially lower your character's damage. Leave Star Dispersion for specialized units with Mizuki or Sandrone, calm down.
When will he get buffed?! Even Mizuki from the standard banner outperformed him in damage! According to lore, he's stronger than the puppet, but in game, he'll die from one of her poke.
What stats does he gain when he ascends?
Hello! The Wanderer's crit chance is leveling up, as indicated in the build.